Python Flask and postgreSQL
For this weeks Linux course homework (h5) at Tero Karvinen’s course, I got a homework to test out Python Flask in both test deployment and production environment.
The Final step is to connect a PostgreSQL-database and read out some data from the database.
I’ll base my experiment at this guide http://terokarvinen.com/2017/hello-python-flask-web-app-development-server-install-on-ubuntu-16-04
”Hello world” on Flask
First I start by installing the flask components and curl to test the endpoints without using my GUI web browser.
sudo apt-get update && sudo apt-get install -y python3-flask curl
The next step is to create a directory for my new python project and create the main-class inside.
I’ll name my project as ”helloFlask” and the main-class will be simply named as ”main.py”
mkdir helloFlask && cd helloFlask
nano main.py
inside the main-class file, I’ll just put the very basic structure to run Flask:
from flask import Flask

app = Flask(__name__)
@app.route(”/”)
def helloWorld():
return ”Hello World!”
if __name__ == ”__main__”:
app.run(debug=True)
It seems a bit confusing, but let me explain, what is happening here.
At the first line, I import Flask-class from the flask-library.
Next I store a new Flask object (with variable __name__)
into an app-variable. Then comes the app.route-annotation, where I define a root-level request dispatcher on top of helloWorld()-function, which
returns a string ”Hello World!”, when called.
Next, there’s a checker for __name__ to be ”__main__”-string and if so, the class will be run with debug-mode.
Now I have everything set, so let’s start the program into a test run and see, if it compiles and works.
CAUTION: the following method is only allowed to be used on the development purposes. It’s not considered safe enough to be run on
a production environment, especially on servers accessible via public Internet.
I will go through the production initialization process later at this article.
python3 main.py
returns
 * Running on http://127.0.0.1:5000/ (Press CTRL+C to quit)

* Restarting with stat
now it runs actively on my terminal session. To test out the root endpoint, I can use curl for that purpose.
First I open up an new terminal tab and then, with curl, I call the local ip-address and the port mentioned on Flask’s startup response.
curl 127.0.0.1:5000
response
Hello World!krister@krister-VirtualBox:~/helloFlask$
there wasn’t any linebreak on that response string, therefore the terminal prefix was printed right after the response.
Anyway, this is a proof, that my code works.
Deploying Flask project into Production environment with wsgi
Next thing is to test, how the production deployment works. I’ll be following the points of this tutorial http://terokarvinen.com/2016/deploy-flask-python3-on-apache2-ubuntu
First I need an apache2-server installed
sudo apt-get install apache2
curl http://localhost/ | grep title
results
Apache2 Ubuntu Default Page: It works
Now that the apache server is up and running, it’s time to install mod_wsgi into it
sudo apt-get install -y libapache2-mod-wsgi-py3
The next thing is to create a configuration file for apache2 that runs my helloFlask-project
sudoedit /etc/apache2/sites-available/helloFlask.conf
content
ServerName virtualbox.krister.com
WSGIDaemonProcess helloFlask user=krister group=krister threads=5
WSGIScriptAlias / /home/krister/helloFlask/main.wsgi
WSGIProcessGroup helloFlask
WSGIApplicationGroup %{GLOBAL}
WSGIScriptReloading On
Require all granted
This just simply a virtualhost-configuration that defines the home path of my project.
Since the main.wsgi-file doesn’t exist yet, let’s create it now
nano ~/helloFlask/main.wsgi
content
import sys
if sys.version_info[0]<3: #check if is run with python3
raise Exception("Python3 is required to run this program! Current version: '%s'" %
sys.version_info)
sys.path.insert(0,'/home/krister/helloFlask/') # path where the project is located
from main import app as application
Now I shall disable the default page configuration from apache2 and enable this new config, helloFlask.conf, instead
sudo a2dissite 000-default.conf

sudo a2ensite helloFlask.conf

sudo service apache2 restart
now I’m going to test, if this setting works with curl. Luckily, since the apache2-server handles the traffic, I can just call plain localhost
curl http://localhost/
result
Hello World!krister@krister-VirtualBox:~/helloFlask$
again, the linebreak was missing, but it printed out the ”Hello World!”-phrase, as I wanted, so it’s quaranteed to work.
Read content from PostgreSQL with Python Flask
I’ll base my testing to this tutorial http://terokarvinen.com/2017/database-connection-from-python-flask-to-postgre-using-raw-sql
First of all, let’s install PostgreSQL
sudo apt-get install -y postgresql
next, I create a new database
sudo -u postgres createdb helloflask
and finally, I create a new database user
sudo -u postgres createuser krister
the next thing is to install sql-alchemy and postgresql-flask-module
sudo apt-get install -y python3-flask-sqlalchemy python3-psycopg2
and finally, let’s modify my main.py file to insert some data into the db and read it out when the endpoint is called
nano ~/helloFlask/main.py
content
from flask import Flask, render_template

from flask_sqlalchemy import SQLAlchemy

app = Flask(__name__)

db = SQLAlchemy(app)

app.config['SQLALCHEMY_DATABASE_URI'] = 'postgresql://krister/helloflask'

app.config['SECRET_KEY'] = 'k377AglooNex+932.asdjReajeIxane436'
def sql(rawSql, sqlVars={}):
assert type(rawSql)==str
assert type(sqlVars)==dict
res=db.session.execute(rawSql, sqlVars)
db.session.commit()
return res
@app.before_first_request
def initDBforFlask():
sql(”CREATE TABLE IF NOT EXISTS members (id SERIAL PRIMARY KEY, name VARCHAR(160) UNIQUE);”)
sql(”INSERT INTO members(name) VALUES (’Tom Johnson’),(’John Thompson’) ON CONFLICT (name) DO NOTHING;”)
@app.route(”/”)
def helloWorld():
return ”Hello World!”
@app.route(”/members”)
def members():
members=sql(”SELECT * FROM members;”)
return render_template(”members.html”, members=members)
if __name__ == ”__main__”:
from flask_sqlalchemy import get_debug_queries
app.run(debug=True)
to parse out the database content cleanly, I’ll define an html-template named members.html
mkdir ~/helloFlask/templates
nano ~/helloFlask/templates/members.html
content
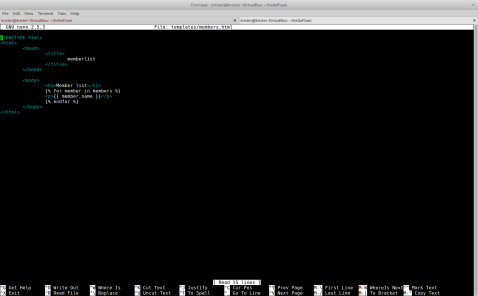
memberlist
Member list
{% for member in members %}
{{ member.name }}
{% endfor %}
and now, curl localhost/members
apparently there’s an error in the code, since I got Internal Server Error 500
For some reason, the apache logs don’t say anything about it, even if I try to grep
Let’s run it on test environment
python3 ~/helloFlask/main.py
curl localhost:5000/members
okay, now I got the error traceback
sqlalchemy.exc.OperationalError: (psycopg2.OperationalError) could not translate host name "krister" to address: Name or service not known
It’s propably a syntax error, according to this https://stackoverflow.com/questions/23839656/sqlalchemy-no-password-supplied-error
the correct syntax is postgresql://user:password@localhost:5432/database_name so let’s change that part on SQLALCHEMY_DATABASE_URI
app.config['SQLALCHEMY_DATABASE_URI'] = 'postgresql:///helloflask
curl localhost:5000/members

nice! now it works!
LAMP-stack exercise (h3)
This blog post is made based on the class exercises and homeworks (h2) at Haaga-Helia course Linux servers (Linux palvelimet) hosted by Tero Karvinen
For these exercises, I’ll be using the same computer and xubuntu boot stick that I had on exercises h1 and h2.
Exercise a)
As a first exercise, I need to install an apache2-server and make the websites of the users work.
Probably the best way to provide that is to test the website with my current default user and then
copy the content into /etc/skel-folder. That’ll make sure the content is copied into all of the created
user accounts and they are guaranteed to work.
First thing is to run
sudo apt-get update
so the package database is up-to-date and have the latest versions of packages available.
then I simply run
sudo apt-get install apache2
and the apt installs me the whole apache2-server
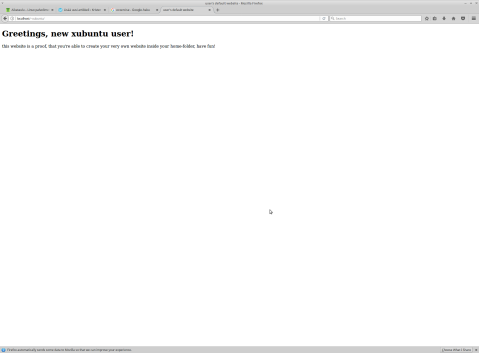
let’s see if it’s running: I open my web browser and type ”localhost” to the address bar:

seems to work and according to the apt-log history, this took about 1 minute to accomplish.
Next thing is to enable scanning of the user directories for html-pages and that requires enabling module called ”userdir”
xubuntu@xubuntu:~$ sudo a2enmod userdir

Enabling module userdir.

To activate the new configuration, you need to run:

service apache2 restart

xubuntu@xubuntu:~$ sudo service apache2 restart

xubuntu@xubuntu:~$
okay, let’s try it out by first creating folder called ”public_html” into xubuntu-user’s (the default live user) home folder
mkdir ~/public_html
and then I shall create an index.html-file with nano
nano ~/public_html/index.html

Let’s try with a simple text first, so we can see that the apache actually catches our created file after all.
Now I open my browser again and this time type ”localhost/~xubuntu” on the address bar.

and it works.
Next, since the requirement is to make user’s website to work, it needs to be a valid html5. So I’ll modify the index.html to contain the following text:

now let’s see what the browser says now on ”localhost/~xubuntu”:
and now, to be absolutely certain that the html-code is valid html5, I can verify that on a validator found from https://validator.w3.org

the green bar indicates that no errors were found, so the file is valid html5.
So, now we got a running http-server, that has the user directory scans enabled and I have a working html5-website available.
If I just make sure that every user, who is going to be created on this computer, would have the same website running on their home-folder, I can assure that they all have a working website editable on their home-folder.
Therefore I need to copy this public_html-structure into /etc/skel-folder, so the operating systems takes care of copying the content into every new user’s home folder.
I’ll just run the following command
sudo cp -r ~/public_html /etc/skel
and now I just create a new user to see if it copies properly, for example named ”test”. based on the man-page, I call command
sudo adduser test
and the result is
xubuntu@xubuntu:~$ sudo adduser test

Adding user `test' ...

Adding new group `test' (1000) ...

Adding new user `test' (1000) with group `test' ...

Creating home directory `/home/test' ...

Copying files from `/etc/skel' ...

Enter new UNIX password:

Retype new UNIX password:

passwd: password updated successfully

Changing the user information for test

Enter the new value, or press ENTER for the default

Full Name []:

Room Number []:

Work Phone []:

Home Phone []:

Other []:

Is the information correct? [Y/n] y

xubuntu@xubuntu:~$
since the adduser-command should have taken care of copying the files from /etc/skel, I don’t need to login into the account.
I can just open a browser and write ”localhost/~test” to the address bar

works like charm. Now I can assume that every new user will have a working copy of an html5-valid website on their home-folder.
Exercize b)
The next task is to cause 200-http code on the apache-logs and 404-http code as well and then analyze the lines.
The apache log seems to be located at /var/log/apache2/access.log and the last record happened (by checking the file with tail-command) occurred at [10/Sep/2017:16:10:20 +0000], therefore all the newer lines will be a cause of my actions.
Let’s start with a 200 status code. It can be caused by simply navigating to a working website, so I’ll just open my browser and type ”localhost/~xubuntu”
now, by commanding
tail /var/log/apache2/access.log
a new row has appeared:
127.0.0.1 - - [10/Sep/2017:16:18:54 +0000] "GET /~xubuntu/ HTTP/1.1" 200 558 "-" "Mozilla/5.0 (X11; Ubuntu; Linux x86_64; rv:54.0) Gecko/20100101 Firefox/54.0
the first part says, that someone from ip-address 127.0.0.1 has made request at 10.9.2017 16:18:54 UTC and it was GET-request pointing at resources from /~xubuntu/ with protocol HTTP version 1.1 and the status was 200 OK. The following number 558 is a bit mysterious, but next we can conclude information from the sender, that the request was made with Mozilla Firefox by using Graphical user interface (X11), the distro was Ubuntu, the operating system was a 64-bit Linux, the layout engine is Gecko and the Firefox version was 54.0
Now, let’s try to cause a 404 status code by navigating to a website that doesn’t exist. Let’s open a browser and navigate to an address ”localhost/~xubuntu/notexist.html”

From the title of the page, we can see that it caused ”404 Not Found” error status, so it was success.
The /var/log/apache2/access.log has now a new row:
127.0.0.1 - - [10/Sep/2017:16:32:20 +0000] "GET /~xubuntu/notexist.html HTTP/1.1" 404 512 "-" "Mozilla/5.0 (X11; Ubuntu; Linux x86_64; rv:54.0) Gecko/20100101 Firefox/54.0"
It looks pretty similiar as the 200 status code one, except with some changes: this time the GET-request is faced to the path /~xubuntu/notexist.html and it caused 404 error. We used the same OS and the same browser so those information are not affected. That number 512 still remains a mystery.
Exercise f)
The next task is to create and run a web application, which calculates a simple formula from an input given by a user.
I’ve been doing some beer brewing as a hobby and one crucial information is always needed to be calculated for every batch: the alcohol volume.
From the following beginner’s guide http://kotiolutta.blogspot.fi/2014/03/huomioitavaa-oluen-kotivalmistuksessa.html we can see, that the formula for calculating alcohol volume is (OG – FG)*1000/7,67 where OG is original gravity of the wort and FG is final gravity measured after the fermentation is completed.
Since I’ve closed my computer between the second and this third task, I need to install the apache2-server again and install the php-module into it
so after updating the apt-repository database I run
sudo apt-get install apache2
and after the installation is finished, I open my firefox-browser and navigate to ”localhost”

it works now.
Next thing is to install the php-module, but first I’ll create a test application to test out, that the module is actually functioning.
I’ll create a new index.php-file straight to the apache’s root folder
sudo nano /var/www/html/index.php
and then write the following code into the file
when the php-module is successfully activated, we shall see the server information printed out on the index-web page by phpinfo.
Next I’ll install the php-module
sudo apt-get install libapache2-mod-php7.0
after the installation, for the last line, apt tells me
apache2_invoke: Enable module php7.0
so it should be already working
Let’s try out! I’ll open my Firefox browser again and navigate to localhost/index.php

nice, it works.
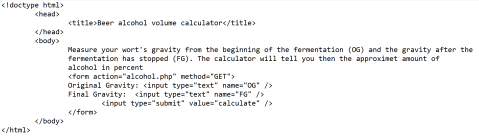
Next I should start the actual programming for my beer alcohol volume calculator. First I’ll make the client page in index.html,
but before doing anything else, I have to move the default apache2 index page aside.
sudo mv /var/www/html/index.html /var/www/html/index.html.default
and then I’ll create a new one:
sudo nano /var/www/html/index.html
and I add the following code
next is the backend-code in php
sudo nano /var/www/html/alcohol.php
with the following code
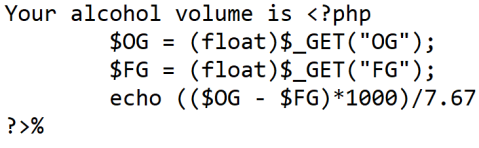
now save and let’s try it out. Now I’ll open my Firefox-browser and navigate to the ”localhost”

the form page seems to work. Luckily I got my readings from my current batch, so we can try how the calculator works. I’ll add the following values
OG= 1.042G
FG= 1.005G
and click the ”calculate”-button

it works and the result seems about right.
Maybe I should also round it to two decimals, so it looks more nicer.
Based on this link https://www.w3schools.com/php/func_math_round.asp it should be as simple as using function round(number,decimal amount), so let’s give it a try.
First I open the php-file for modification
sudo nano /var/www/html/alcohol.php
and modify the code at the following
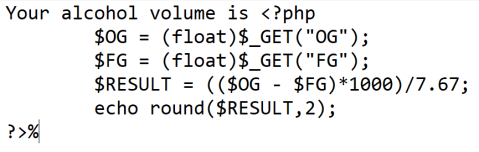
now save and let’s try again:
first I open my browser and type ”localhost” on the address bar

I’ll just use the same values as earlier, then click the ”calculate”

and, as we can see, the result has rounded up nicely to 4.82%
Therefore I now have a required server-side web application that calculates simple formula.
SaveVisits
Kuvaus: Ohjelman avulla käyttäjä voi helposti tallentaa senhetkisen sijaintinsa muistipaikaksi, sekä liittää ottamiaan kuvia, paikan nimen ja yläkategorian organisointia varten.
Status: alpha
Lisenssi: Creative Commons 3.0 Attribution unported
Lähdekoodi: SaveVisits
Linkit:
terokarvinen.com
w3school
JSON
cordova
Vanhan Linux-kokeen kokeilu
Työasemat ja Tietoverkot -kurssin Linux-kokeeseen valmistautuen päätin harjoituksen vuoksi tehdä vanhan kurssikokeen kotona ja laatia raportin muistamisen tueksi.
Tehtävänanto kuuluu seuraavasti:
“Karttakatu Oy
Me Karttakatu Oy:ssä teemme karttoihin liittyviä weppisovelluksia. Olemme muutaman hengen yritys.
Asenna työasema, jolla tavallisimmat toimistotyöt onnistuvat (weppisurffailu, tekstinkäsittely). (Asentuessa voit käydä kommentoimassa kavereiden blogeja).
Työntekijämme ovat Einari Vähäkäähkä, Pekka Winha, Åke Andersson ja Leila Laila. He haluavat kehittää PHP-kotisivuja etäkäyttöyhteydellä. Asenna tarvittavat palvelut ja tee esimerkkisivut.
Asenna kaikkien käyttäjien käyttöön skripti (shell script) nimeltä “mystatus”, joka näyttää vapaan levytilan (df -h) ja koneen ip-osoitteen.
Tähtäätkö huipputulokseen? Pekka Winha haluaa käyttää MySQL tietokantaa. Asenna hänelle MySQL-tietokanta ja siihen PhpMyAdmin-weppiliittymä.”
Aion asentaa työasemaksi Xubuntu Linux 12.04 -käyttöjärjestelmän, jossa on webbisurffailua varten Firefox -selain. Kotisivujen luontia varten asennan käyttäjille Apache2-demonin ja siihen luon valmiiksi esimerkkisivut käyttäjille erikseen.
Aloitetaan
23.9.2012
18:06 Alustus
Käynnistin koneelleni Xubuntu Linux 12.04 -live-cd:n johon teen tarvittavat muokkaukset. Normaalisti asentaisin järjestelmän kokonaan koneelle, mutta tämä on harjoitustyö.
Valitsin kieleksi englanti (kielen voi tarvittaessa määrittää erikseen kaikille käyttäjille)
Vaihdoin näppäimistön oletuskielen suomeksi komennolla
$ setxkbmap fi
18:07 mystatus-script
ennen käyttäjän luomista kirjoitin tehtävänannossa pyydetyn mystatus-shellscriptin ja lisäsin sen kansioon /etc/skel/
Tämä sen takia, että tiedosto kopioituu silloin automaattisesti uudelle käyttäjälle aina, kun uusi käyttäjä luodaan. Tämä nopeuttaa ylläpitäjän toimia huomattavasti.
Menen siis ensiksi omaan /home/xubuntu/ -kansiooni ja suoritan seuraavan komennon
$ nano mystatus
sen jälkeen kirjoitin tekstieditoriin seuraavan koodin:
#!/bin/bash
df -h
ifconfig
Seuraavaksi tallensin tiedoston, tein siitä kopion kohteeseen /usr/local/bin/ komennolla
$ sudo cp mystatus /usr/local/bin/
ja asetin kaikille käyttäjille oikeudet komennolla
$ sudo chmod a+x mystatus
nyt pystyn ajamaan scriptin kirjoittamalla $ mystatus
kopioin seuraavaksi script-tiedoston kansioon /etc/skel
$ sudo cp mystatus /etc/skel/
näin tiedosto kopioituu myös kaikkien uusien käyttäjien kotihakemistoon
18:40 käyttäjät
loin käyttäjät koneelle komennoilla
$ sudo adduser einari
$ sudo adduser pekka
$ sudo adduser åke
$ sudo adduser leila
laitoin salasanaksi heidän etunimensä, mikä on huono salasana, mutta testivaiheessa ei välttämätön. Todellisessa työtehtävässä tekisin jonkinlaisen salasanamuodostusohjeen tekstitiedostoon ja lisäisin sen /etc/skel/ -hakemistoon. Näin käyttäjät pääsisivät itse tarkistamaan ja vaihtamaan salasanansa omanlaisikseen.
Jouduin tekemään poikkeuksen Åken tunnuksessa, sillä ääkkösiä ei suvaita tunnuksen nimessä. Kirjoitin vastaavasti käyttäjänimeksi ake ja kokonimeksi Åke Andersson, näin ei tule sekaannuksia
19:00 Toimistotyökalut
Asensin libreofficen komennoilla
$ sudo apt-get update
$ sudo apt-get install libreoffice
19:10 – 19:12 Kotisivujen luontimahdollisuus
asensin Apache2 jotta käyttäjät pääsevät tekemään ja jakamaan omia kotisivujaan.
$ sudo apt-get install apache2
testasin että localhost toimii avaamalla firefoxin, samalla tuli myös firefoxin toiminta todettua
Tulostui seuraava teksti
It works!
This is the default web page for this server.
The web server software is running but no content has been added, yet.
Näinollen Apache2 asentui oikein ja toimii, samoin firefox toimii ilman ongelmia.
19:59 index.html
Seuraavaksi halusin luoda testisivut jokaiselle käyttäjälle, joten ensiksi muokkasin Apachen moduulia hakemaan nettisivun /home/user-kansiosta
$ sudo a2enmod userdir
$ sudo service apache2 restart
nyt loin jokaiselle käyttäjälle public_html -kansion, jonne teen oletus- eli index.html-tiedostot
$ for S in ake einari leila pekka ; do sudo mkdir /home/$S/public_html/; done
seuraavaksi loin index.html:t komennolla
$ nano index.html
ja kopioin tiedostot kaikille käyttäjille komennolla
$ sudo cp index.html /home/[user]/public_html/
jossa [user] on käyttäjän nimi
varmistetaan vielä että jokaisella käyttäjällä on oikeus kirjoittaa index.html-tiedostoaan, muuten he eivät pysty muokkaamaan sivustoaan lainkaan
$ for S in pekka leila ake einari ; do sudo chmod a+rwx /home/$S/public_html/index.html; done
nyt pitäisi sivut toimia, avasin nettiselaimen ja tarkistin osoitteesta localhost/~[user]/ jossa [user] on käyttäjätunnus, toimiiko index.html-tiedostot kaikilla käyttäjillä.
Ei toiminut joten seuraavaksi kokeilin uudestaan muokata apachen moduulia:
$ sudo a2enmod userdir
$ sudo service apache2 restart
nyt jokaisella käyttäjänimellä tulostui Hello World!, eli kotisivut toimivat.
20:30 PHP
Seuraavaksi asensin tehtävänannon mukaisesti kaikille käyttäjille PHP-käyttömahdollisuuden, joten ensiksi asensin apache2 kuuluvan PHP5-kirjaston:
$ sudo apt-get install libapache2-mod-php5
tämän jälkeen annoin komennon
$ sudoedit /etc/apache2/mods-enabled/php5.conf
ja ”uloskommentoin” eli lisäsin rivien 11-15 eteen merkin #
kyseinen silmukka estää PHP-tiedostojen käytön käyttäjän kotihakemistosta, joten toimintamme kannalta se on turha.
Tämän jälkeen kaikki index.html -tiedostot tulee muuttaa muotoon index.php. Tämä kävi helpoiten komennolla
$ for S in leila pekka einari ake ; do sudo mv /home/$S/public_html/index.html /home/$S/public_html/index.php; done
ja varmistetaan käyttöoikeudet:
$ for S in leila pekka einari ake ; do sudo chmod a+rwx /home/$S/public_html/index.php; done
nyt tiedostoilla voi tehdä PHP-koodausta ja se näkyy samalla tavalla nettiselaimella kuin aiemmin testattuamme html-tiedostot.
21:00 etäkäyttömahdollisuus
seuraavaksi piti jokaiselle käyttäjälle järjestää mahdollisuus etäkäyttää omaa käyttäjätunnustaan, joten asensin openSSH-palvelimen
$ sudo apt-get install openssh-server
seuraavaksi kokeilin yhdistää kaikkiin käyttäjätunnuksiin xubuntu-käyttäjätunnuksilla:
ensin selvitin koneeni ip-osoitteen
$ ip addr
tämän jälkeen muodostin yhteyden suoraan ssh:lla komennolla
$ ssh [user]@192.168.1.67
yhteys muodostui jokaisen käyttäjän kohdalla, näin ollen lähiverkossa yhteydenmuodostus onnistuu. Mikäli kotona haluaa kokeilla openSSH:n käyttöä, tulee oman reitittimen palomuuriin tehdä portille 22 aukko ulkoisille pyynnöille, jotta esimerkiksi kännykällä voi ottaa ssh-yhteyden koneeseen. Tämä asetus kuitenkin riippuu eri reitittimien hallintaliittymän asetuksista, jotka käytännössä ovat kaikissa erilaisia. Siksi en paneudu aiheeseen vielä tämän tarkemmin.
21:15 mySQL
Seuraavaksi asennan Pekka Winhalle mySQL-tietokannan asentamalla paketin
$ sudo apt-get install mysql-server
määritän salasanat ja tämän jälkeen lisään terokarvinen.com -sivulta poimimani php-sivun, jolla päästään käsiksi mySQL:n
$ ssh pekka@192.168.1.67
$ cd public_html/
$ nano database.php
tiedostoon lisäämäni koodi löytyy osoitteesta http://myy.helia.fi/~karte/fedora_linux_apache_mysql_php.html
kohdasta ”PHP database example
”
tämän jälkeen tallensin ja kirjoitin
$ exit
nyt mySQL-tietokantaan pääsee käsiksi osoitteesta http://192.168.1.67/~pekka/database.php ja Pekka voi sitä omalla käyttäjätunnuksellaan muokata
21:45 Lyhyesti
Kertauksena asensin käyttöjärjestelmän (live-cd tässä tapauksessa), loin neljä käyttäjää (adduser-komento), kaikille käyttäjille PHP-nettisivujen luomismahdollisuus (Apache2, PHP5-kirjasto ja index.php-tiedostot käyttäjäkansioihin), mahdollisuuden kirjautua etänä (openSSH-demoni, mahdolliset aukkojen tekemiset palomuuriin) ja Pekalle erikseen pääsyn mySQL-tietokantaan (mySQL-server, PHP-ajettava database-tiedosto käyttäjäkansioon)
Lähteet:
http://myy.helia.fi/~karte/fedora_linux_apache_mysql_php.html
http://terokarvinen.com/2012/linux-koe-tyoasemat-ja-tietoverkot-25
https://kristerholmstrom.wordpress.com/
GNU Free Documentation License
Version 1.3, 3 November 2008
Copyright © 2000, 2001, 2002, 2007, 2008 Free Software Foundation, Inc. <http://fsf.org/>
Everyone is permitted to copy and distribute verbatim copies of this license document, but changing it is not allowed.
PHP:n käyttö nettisivuilla
Sain Työasemat ja tietoverkot -kurssilla tehtäväksi asentaa Apache-palvelindemonin sekä PHP-kirjaston kotisivujen luomista varten. Lisäksi minun piti tehdä PHP-sivu, joka tulostaa nettiselaimeen ”Hei maailma!” ja sivu, joka käyttäjän antamien tietojen perusteella laskee henkilön painoindeksin.
Apache-palvelindemoni ylläpitää palvelinta ja kommunikoi asiakasselaimien kanssa, jolloin tavallisella nettiselaimella pääsee käyttäjän määrittämälle kotisivulle IP-osoitteen avulla.
PHP tarjoaa HTML:ää laajemmat mahdollisuudet luoda mm. lomakekenttiä ja grafiikkaa sekä tietokantoja kotisivulle. Lisäksi PHP on yleensä valmiiksi tuettu eri nettiselaimissa, joten se on valmiiksi yhteensopiva asiakaskoneille.
Mikäli Apachen asennus ja käyttö tai komentokehotteen komennot tuntuvat haastavilta, olen kirjoittanut perusasioista artikkelit: https://kristerholmstrom.wordpress.com/2012/09/05/apache-2-asennus-xubuntulle/
9.9.2012
23:12 Boottaus ja Apachen asennus
aloitin käynnistämällä koneeni Xubuntu linux 12.04 -live CD:llä ja avasin terminaalin. Aluksi minun piti asentaa Apache, jotta pystyisin jakamaan PHP-kotisivun. Apache asennetaan samalla tavalla kuten muutkin ohjelmat, eli komennolla
$ sudo apt-get update
$ sudo apt-get install apache2
23:23 Apachen moduulin muokkaus
Seuraavaksi muutin apache2-moduulin hakemaan oletusnettisivutiedostoa käyttäjähakemistosta. Ensin kuitenkin menin terminaalilla kohteeseen /home/xubuntu/ ja loin uuden kansion nimeltä public_html. Seuraavaksi loin HTML-tiedoston komennolla
$ nano index.html
Huomaa että tiedoston nimi tulee olla index, jotta Apache osaa sitä etsiä oletuksena.
Apache-moduuli muutetaan komennolla
$ sudo a2enmod userdir
seuraavaksi apache piti uudelleenkäynnistää, mikä tapahtuu komennolla
$ sudo service apache2 restart
23:30 Apachen testaaminen
tässä vaiheessa oli hyvä kokeilla, miten apache toimi, joten toimin asiakkaana ja käynnistin nettiselaimen, jonka osoiteriville kirjoitin IP-osoitteeni sekä käyttäjäkansion nimen.
IP-osoite selviää komennolla
$ ip addr
osoitteeni on siis http://192.168.1.67/~xubuntu/
kyseisestä osoitteesta tulostui index.html-tiedostoni tieto kun syötin osoitteen nettiselaimeeni.
23:35
PHP-tulkki asennetaan lataamalla Apache2 erillinen mod-kirjasto, joten asennus tapahtui hieman eri tavalla kuin muissa ohjelmissa. Käytin komentoa
$ sudo apt-get install libapache2-mod-php5
Tämän jälkeen kävin muuttamassa php5-asennuslogia, jotta tulkki toimisi oikein. Käytin komentoa
$ sudoedit /etc/apache2/mods-enabled/php5.conf
sen jälkeen ”kommentoin ulos” kaikki rivit välillä <ifModule mod_userdir.c> … </ifModule>, eli lisäsin rivien eteen #-merkin, jolloin rivit muuttuvat kommenteiksi, eikä tulkki silloin huomio rivejä lainkaan.
23:46 PHP-tiedoston luominen
Seuraavaksi index.html-tiedosto piti muuttaa PHP:ta tukevaksi tiedostoksi. Tämä onnistui siirtymällä kansioon /home/xubuntu/public_html/ ja antamalla komennon
$ mv index.html index.php
nyt tiedosto pystyi sisältämään PHP-koodia ja Apache tulkitsemaan sitä.
23:52 PHP-koodi
PHP-koodin selventämiseen tässä artikkelissa menisi paljon aikaa ja tilaa, enkä välttämättä saisi annettua kovinkaan syvällistä kuvaa ohjelmoinnista, joten annan linkin, jonka kautta voi tutustua PHP-ohjelmointiin tarkemmin, erityisesti HTML-pohjaisena:
http://www.php.net/manual/en/tutorial.forms.php
Muokkasin seuraavaksi index.php:ta niin, että se tulosti lauseen ”Hei Maailma!”
kyseinen lause tulostuu kirjoittamalla kotisivutiedostoon <? PHP print(”Hei Maailma!”); ?>
En saanut painoindeksilaskuria vielä toimimaan, mutta lisään koodin tähän artikkeliin kun saan sivun näyttämään tuloksen oikein.
lähde: http://terokarvinen.com/2012/aikataulu-–-tyoasemat-ja-tietoverkot-ict1tn002-33-syksylla-2012
GNU Free Documentation License
Version 1.3, 3 November 2008
Copyright © 2000, 2001, 2002, 2007, 2008 Free Software Foundation, Inc. <http://fsf.org/>
Everyone is permitted to copy and distribute verbatim copies of this license document, but changing it is not allowed.
Apache 2 asennus xubuntulle
Sain kotitehtäväksi asentaa Apache 2 -verkkopalvelimen kotikoneelleni sekä testata yhteydenottoa “Demoniin” (verkkopalvelua tarjoava ohjelma, joka esittää esimerkiksi omat kotisivut asiakaskoneelle heti pyynnön saavuttua. Tässä tapauksessa demoni on Apache). Yhteydenotto suoritetaan silmukoimalla, eli verkkokortista luodaan virtuaalinen haamuversio joka sitten toimii asiakaskoneena. Todellisuudessa datayhteys tekee vain lenkin verkkokortin kautta.
Lisäksi minun tuli tehdä normaali sivunlataus, sekä tahallisesti suoritettu “sivua ei löydy” -lataus, jotta molemmista tulee merkinnät lokiin. Nämä merkinnät minun tuli sitten löytää Apachen lokihakemistosta /var/log/Apache2/.
Lisäksi minun tuli testata Telnet-yhteyden muodostamista Demoniin ja kokeilla mitä tapahtuu.
Aloitetaan
4.9.2012
21:01 Apache-asennus
Suoritin Apache2 asennuksen komentokehotteen kautta samalla tavalla kuin minkä tahansa muunkin ohjelman asennuksen, eli komennolla
$ sudo apt-get install apache2
21:05 Silmukointi
kun apache2 asentui koneelleni, halusin testata sitä silmukoinnilla, eli avataan nettiselain (esim. Firefox) ja kirjoitetaan sinne osoite http://localhost, terminaalista pääsee suoraan komennolla
$ firefox “http://localhost”
Seuraavan tekstin pitäisi ilmestyä mikäli kaikki on kunnossa:
It works!
This is the default web page for this server.
The web server software is running but no content has been added, yet.
Selaimellani kyseinen teksti ilmestyi eli kaikki kunnossa ja asennus onnistui!
21:10 IP-osoitteen selvittäminen
Seuraavaksi halusin tietää demonin IP-osoitteen, eli osoitteen, jolla joku muu kone pystyy vierailemaan palvelimellani. Se selviää komennolla
$ ip addr
komento toi kolme eri yhteyttä, jotka on kytkettynä koneeseeni, eli
- lo – tarkoittaa silmukointia, eli tämän kautta verkkokortti ottaa yhteyttä omaan koneeseen
- eth0 – ethernet-paikka 0 eli modeemin ja koneen välille tuleva ethernet-kaapeli
- wlan0 – langaton verkko
itselläni ainoastaan wlan0 antoi toimivan IP-osoitteen kohdassa inet
Ote terminaalista:
3: wlan0: <BROADCAST,MULTICAST,UP,LOWER_UP> mtu 1500 qdisc mq state UP qlen 1000
link/ether c4:17:fe:82:39:cd brd ff:ff:ff:ff:ff:ff
inet XXX.XXX.X.XX/24 brd 192.168.1.255 scope global wlan0
inet6 fe80::c617:feff:fe82:39cd/64 scope link
valid_lft forever preferred_lft forever
tässä tapauksessa oman koneeni apachen IP-osoite on XXX.XXX.X.XX.
IP-osoitteen voi testata selaimella samaan tapaan kuin aiemmin testasin localhost-osoitetta syöttämällä osoitteen muodossa http://XXX.XXX.X.XX/
21:25 Moduulin käyttöönotto
seuraavaksi halusin luoda pienen testisivun joka näkyisi selaimella.
Ensimmäiseksi pitää käynnistää apache2:n moduuli, joka hakee käyttäjähakemistosta oletussivua muodossa index.html esim. /home/xubuntu/public_html/index.html
loin public_html -kansion menemällä ensin home-kansioon komennolla
$ cd
seuraavaksi loin kansion komennolla
$ mkdir public_html
käynnistin vielä moduulin komennolla
$ sudo a2enmod userdir
$ sudo /etc/init.d/apache2 restart
21:31 Kotisivun avaaminen selaimella
kokeilin public_html – kansion selaamista selaimella osoitteessa http://XXX.XXX.X.XX/~(käyttäjä)/ ilman sulkuja.
Ilmoitukseksi tuli
Not Found error 404
tämä meni oikein sillä moduuli oletuksena etsi avattavaa index.html -tiedostoa, jota ei ole vielä luotu. Näin sain samalla kirjattua Apache2-lokiin epäonnistuneen latauksen, kuten tehtävänannossa pyydettiin.
21:39 Index.html tiedoston luominen
loin index.html -tiedoston, joka ajetaan moduulin kautta.
Yksinkertainen html-sivu voi olla testimielessä muotoa
<html>
<body>
<p> moi </p>
</body>
</html>
nyt selain näytti sivulla http://XXX.XXX.X.XX/~(käyttäjä)/ sivun, jossa luki
moi
samalla lokiin kirjattiin onnistunut sivun avaus, kuten tehtävänannossa haluttiin.
21:51 Apache-loki
avaan Apachen lokin tutkimista varten menemällä kansioon
$ cd /var/log/apache2/
avaan access.log -tiedoston nanolla:
$ nano access.log
Lokissa löytyy yhteydenottotiedot asiakkaalta, joten poimin kaksi viimeisintä riviä:
192.168.1.67 – – [05/Sep/2012:05:46:29 +0300] ”GET /krister/ HTTP/1.1” 404 501 ”-” ”Mozilla/5.0 (X11; Ubuntu; Linux i686; rv:11.0) Gecko/20100101 Firefox/11.0”
192.168.1.67 – – [05/Sep/2012:05:47:51 +0300] ”GET /~krister/ HTTP/1.1” 200 387 ”-” ”Mozilla/5.0 (X11; Ubuntu; Linux i686; rv:11.0) Gecko/20100101 Firefox/11.0”
ensimmäisellä rivillä löytyi numero 404, mikä tarkoittaa että moduulilta on pyydetty username-kansiosta index.html nimistä sivua, mutta sitä ei ole löytynyt.
Toisella rivillä löytyi samasta kohdasta numero 200 mikä tarkoittaa että pyydetty sivu löytyi ja avautui onnistuneesti
molemmilla riveillä ilmoitusnumeron edessä oleva 1.1 viittasi siihen että sivua haettiin nimenomaan html 1.1 muodossa. Sitä aiempi päiväys kertoo tarkalleen milloin sivua on yritetty hakea ja lopusta löytyvä Firefox/11.0 kertoi selaimen tiedot aina versionumerointiin asti.
22.06 Telnet-yhteys
Otan yhteyden demoniin käyttäen telnet-yhteyttä komennolla
$ telnet localhost 80
kirjoitin kokeilumielessä sanan “moi”, tulos oli:
<!DOCTYPE HTML PUBLIC ”-//IETF//DTD HTML 2.0//EN”>
<html><head>
<title>501 Method Not Implemented</title>
</head><body>
<h1>Method Not Implemented</h1>
<p>moi to /index.html not supported.<br />
</p>
<hr>
<address>Apache/2.2.22 (Ubuntu) Server at 127.0.1.1 Port 80</address>
</body></html>
Connection closed by foreign host.
Telnet-yhteydellä yritin siis kirjoittaa komentoja suoraan index.html-sivulle, joka ei sitä lainkaan tukenut, näinollen isäntä eli demoni sulki yhteyden.
Lähde:
http://terokarvinen.com/2008/install-apache-web-server-on-ubuntu-4
GNU Free Documentation License
Version 1.3, 3 November 2008
Copyright © 2000, 2001, 2002, 2007, 2008 Free Software Foundation, Inc. <http://fsf.org/>
Everyone is permitted to copy and distribute verbatim copies of this license document, but changing it is not allowed.
