Hello world with Python, Java and C in Centos 7
The last exercise (h6) on Tero Karvinen’s Linux servers course. is to write ”Hello world!”-program for three different programming languages and run them on a Linux environment.
I’ll be using the same vps-server with centos 7 I created on my vps-related article, for running the programs.
The programming languages I choose are Java, Python3 and C. For each of them, I’ll be testing out the installation of development tools, compiling the ”hello world”-code and run it on terminal environment.
Java
For a compiler, I’ll be using an openjdk, since it’s available on yum-repository.
By searching the repository, I found that the latest available java version is 1.8, therefore the package name is java-1.8.0-openjdk-devel (notice that you keep the -devel-postfix, otherwise it doesn’t install the compiler, only virtual machine)
sudo yum install -y java-1.8.0-openjdk-devel
Next thing is to create a ”helloworld.java”-file with the following content
public class helloworld {

    public static void main(String[] args) {

            System.out.println("Hello World!");

    }

}
to compile the code, I use javac
javac helloworld.java
now I can run the application with the class-name (filename will not be used here, otherwise it won’t work)
java helloworld
output:
Hello world!
Python
I’m going to use python3 since it’s the latest version, but I must also be aware that the language syntax differs a bit from python2.x -version.
apparently the latest package available is python34, according to the yum search
sudo yum install python34
now I just create a helloworld.py-file with the following content
print("Hello world!")
Note: on python2, the syntax would have been print "hello world", which is not compatible with python3
Now I just run it with command
python3 helloworld.py
output:
Hello world!
C
According to this article https://www.cyberciti.biz/faq/howto-compile-and-run-c-cplusplus-code-in-linux/ I should first install the developer tools with this command
sudo yum groupinstall 'Development Tools'
it installed 26 packages containing gcc-related tools and perl-compilers. It might be a one command to install all the necessary stuff to get started with perl.
Next thing is to write the ”hello world” -program. First I create a file named ”helloworld.c” and put the following content in it
#include
int main(void)
{
printf("Hello world!\n");
return 0;
}
Then I compile it with command ”make”
make helloworld
output:
cc helloworld.c -o helloworld
and finally I run it with the name of the compiled file
./helloworld
output:
Hello world!
Python Flask and postgreSQL
For this weeks Linux course homework (h5) at Tero Karvinen’s course, I got a homework to test out Python Flask in both test deployment and production environment.
The Final step is to connect a PostgreSQL-database and read out some data from the database.
I’ll base my experiment at this guide http://terokarvinen.com/2017/hello-python-flask-web-app-development-server-install-on-ubuntu-16-04
”Hello world” on Flask
First I start by installing the flask components and curl to test the endpoints without using my GUI web browser.
sudo apt-get update && sudo apt-get install -y python3-flask curl
The next step is to create a directory for my new python project and create the main-class inside.
I’ll name my project as ”helloFlask” and the main-class will be simply named as ”main.py”
mkdir helloFlask && cd helloFlask
nano main.py
inside the main-class file, I’ll just put the very basic structure to run Flask:
from flask import Flask

app = Flask(__name__)
@app.route(”/”)
def helloWorld():
return ”Hello World!”
if __name__ == ”__main__”:
app.run(debug=True)
It seems a bit confusing, but let me explain, what is happening here.
At the first line, I import Flask-class from the flask-library.
Next I store a new Flask object (with variable __name__)
into an app-variable. Then comes the app.route-annotation, where I define a root-level request dispatcher on top of helloWorld()-function, which
returns a string ”Hello World!”, when called.
Next, there’s a checker for __name__ to be ”__main__”-string and if so, the class will be run with debug-mode.
Now I have everything set, so let’s start the program into a test run and see, if it compiles and works.
CAUTION: the following method is only allowed to be used on the development purposes. It’s not considered safe enough to be run on
a production environment, especially on servers accessible via public Internet.
I will go through the production initialization process later at this article.
python3 main.py
returns
 * Running on http://127.0.0.1:5000/ (Press CTRL+C to quit)

* Restarting with stat
now it runs actively on my terminal session. To test out the root endpoint, I can use curl for that purpose.
First I open up an new terminal tab and then, with curl, I call the local ip-address and the port mentioned on Flask’s startup response.
curl 127.0.0.1:5000
response
Hello World!krister@krister-VirtualBox:~/helloFlask$
there wasn’t any linebreak on that response string, therefore the terminal prefix was printed right after the response.
Anyway, this is a proof, that my code works.
Deploying Flask project into Production environment with wsgi
Next thing is to test, how the production deployment works. I’ll be following the points of this tutorial http://terokarvinen.com/2016/deploy-flask-python3-on-apache2-ubuntu
First I need an apache2-server installed
sudo apt-get install apache2
curl http://localhost/ | grep title
results
Apache2 Ubuntu Default Page: It works
Now that the apache server is up and running, it’s time to install mod_wsgi into it
sudo apt-get install -y libapache2-mod-wsgi-py3
The next thing is to create a configuration file for apache2 that runs my helloFlask-project
sudoedit /etc/apache2/sites-available/helloFlask.conf
content
ServerName virtualbox.krister.com
WSGIDaemonProcess helloFlask user=krister group=krister threads=5
WSGIScriptAlias / /home/krister/helloFlask/main.wsgi
WSGIProcessGroup helloFlask
WSGIApplicationGroup %{GLOBAL}
WSGIScriptReloading On
Require all granted
This just simply a virtualhost-configuration that defines the home path of my project.
Since the main.wsgi-file doesn’t exist yet, let’s create it now
nano ~/helloFlask/main.wsgi
content
import sys
if sys.version_info[0]<3: #check if is run with python3
raise Exception("Python3 is required to run this program! Current version: '%s'" %
sys.version_info)
sys.path.insert(0,'/home/krister/helloFlask/') # path where the project is located
from main import app as application
Now I shall disable the default page configuration from apache2 and enable this new config, helloFlask.conf, instead
sudo a2dissite 000-default.conf

sudo a2ensite helloFlask.conf

sudo service apache2 restart
now I’m going to test, if this setting works with curl. Luckily, since the apache2-server handles the traffic, I can just call plain localhost
curl http://localhost/
result
Hello World!krister@krister-VirtualBox:~/helloFlask$
again, the linebreak was missing, but it printed out the ”Hello World!”-phrase, as I wanted, so it’s quaranteed to work.
Read content from PostgreSQL with Python Flask
I’ll base my testing to this tutorial http://terokarvinen.com/2017/database-connection-from-python-flask-to-postgre-using-raw-sql
First of all, let’s install PostgreSQL
sudo apt-get install -y postgresql
next, I create a new database
sudo -u postgres createdb helloflask
and finally, I create a new database user
sudo -u postgres createuser krister
the next thing is to install sql-alchemy and postgresql-flask-module
sudo apt-get install -y python3-flask-sqlalchemy python3-psycopg2
and finally, let’s modify my main.py file to insert some data into the db and read it out when the endpoint is called
nano ~/helloFlask/main.py
content
from flask import Flask, render_template

from flask_sqlalchemy import SQLAlchemy

app = Flask(__name__)

db = SQLAlchemy(app)

app.config['SQLALCHEMY_DATABASE_URI'] = 'postgresql://krister/helloflask'

app.config['SECRET_KEY'] = 'k377AglooNex+932.asdjReajeIxane436'
def sql(rawSql, sqlVars={}):
assert type(rawSql)==str
assert type(sqlVars)==dict
res=db.session.execute(rawSql, sqlVars)
db.session.commit()
return res
@app.before_first_request
def initDBforFlask():
sql(”CREATE TABLE IF NOT EXISTS members (id SERIAL PRIMARY KEY, name VARCHAR(160) UNIQUE);”)
sql(”INSERT INTO members(name) VALUES (’Tom Johnson’),(’John Thompson’) ON CONFLICT (name) DO NOTHING;”)
@app.route(”/”)
def helloWorld():
return ”Hello World!”
@app.route(”/members”)
def members():
members=sql(”SELECT * FROM members;”)
return render_template(”members.html”, members=members)
if __name__ == ”__main__”:
from flask_sqlalchemy import get_debug_queries
app.run(debug=True)
to parse out the database content cleanly, I’ll define an html-template named members.html
mkdir ~/helloFlask/templates
nano ~/helloFlask/templates/members.html
content
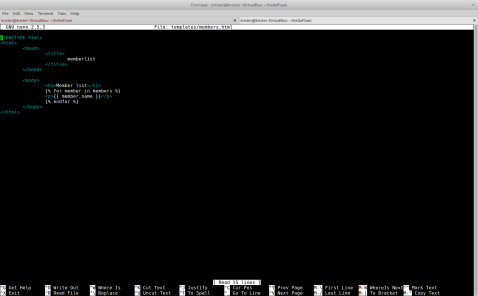
memberlist
Member list
{% for member in members %}
{{ member.name }}
{% endfor %}
and now, curl localhost/members
apparently there’s an error in the code, since I got Internal Server Error 500
For some reason, the apache logs don’t say anything about it, even if I try to grep
Let’s run it on test environment
python3 ~/helloFlask/main.py
curl localhost:5000/members
okay, now I got the error traceback
sqlalchemy.exc.OperationalError: (psycopg2.OperationalError) could not translate host name "krister" to address: Name or service not known
It’s propably a syntax error, according to this https://stackoverflow.com/questions/23839656/sqlalchemy-no-password-supplied-error
the correct syntax is postgresql://user:password@localhost:5432/database_name so let’s change that part on SQLALCHEMY_DATABASE_URI
app.config['SQLALCHEMY_DATABASE_URI'] = 'postgresql:///helloflask
curl localhost:5000/members

nice! now it works!
Installing LAMP, WordPress, custom domain name into Centos 7 virtual private server (h4)
Tero Karvinen’s Linux course is stepping into a world of servers and I got some homeworks revolving around the topic.
This time I’m going to do the following steps:
– start a Centos 7 VPS [finished]
– enable firewall on it [finished]
– make login without password possible [finished]
– check the security logs for bot traffic [finished]
– install rest of the LAMP [finished]
– install WordPress [finished]
– initialize domain name to our WP service [finished]
– install CA-authorized certificates to enable HTTPS [not working]
On the security key generation part, I’ll be using the same laptop I used in my post Xubuntu boot stick creation.
Renting a vps
First I need to choose a VPS provider. The recommended ones, that are cheapest, are DigitalOcean, Linode and Tilaa (limited in the netherlands). If there’s a need for more complex tools, like load balancing multiple servers and hosting server containers, there’s Amazon’s AWS, Google Cloud Platform and Microsoft Azure to mention the biggest ones.
I choose DigitalOcean, because it’s pretty cheap, but also I happen to have a github education pack, which provides me $50 for free. Since the cheapest server pack is $5/month, I can run that server for 10 months without need to pay.
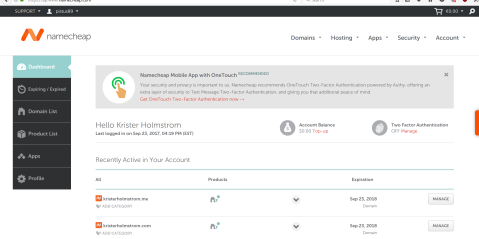
First thing of course is to register to the service and create an account.
When that is accomplished, the following management page opens:
![]()
First I click the green ”create” button and from the dropdown-menu, I pick ”droplets” which is a term on DigitalOcean’s service catalogue for these VPS packages.
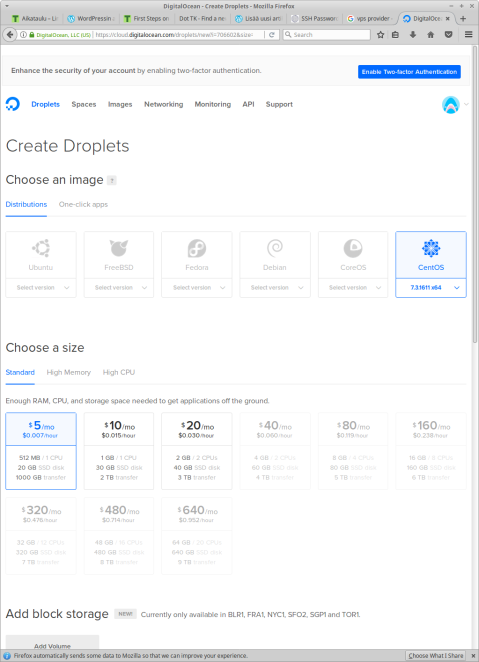
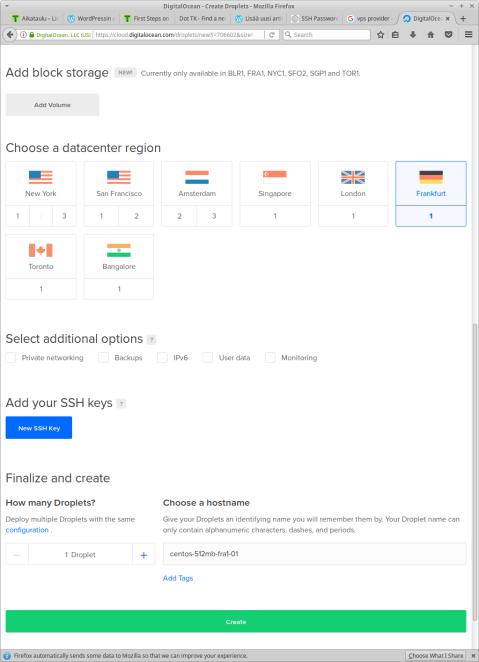
I change the hostname to be wordpress-centos-vps and hit ”create”
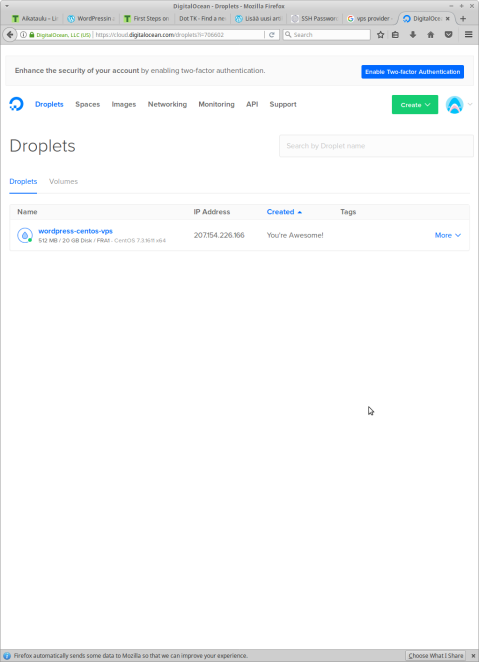
Now the VPS is created and I have my root user’s password sent to my email. Now it’s time to login and follow these steps http://terokarvinen.com/2017/first-steps-on-a-new-virtual-private-server-an-example-on-digitalocean
so first, I’ll establish an ssh connection to the server
ssh root@207.154.226.166
the very first thing is to change your root password, because emailed passwords will bring a serious security risk, even though I’m going to disable the use of root user.
enable the firewall
Next thing to do, would be setting up a firewall to prevent any unwanted access to the server. Apparently Firewalld is a new replacement of the iptables on centos-side, so I need to study it a little bit.
Luckily there’s good tutorial about configuring it and I’ll be referencing to it during this setup https://www.digitalocean.com/community/tutorials/how-to-set-up-a-firewall-using-firewalld-on-centos-7
[root@wordpress-centos-vps ~]# sudo service firewalld start

Redirecting to /bin/systemctl start firewalld.service

[root@wordpress-centos-vps ~]# firewall-cmd --state

running

[root@wordpress-centos-vps ~]# sudo firewall-cmd --zone=public --permanent --add-port=22/tcp

success

[root@wordpress-centos-vps ~]# sudo firewall-cmd --list-all

public

target: default

icmp-block-inversion: no

interfaces:

sources:

services: dhcpv6-client ssh

ports:

protocols:

masquerade: no

forward-ports:

sourceports:

icmp-blocks:

rich rules:
[root@wordpress-centos-vps ~]#
What I did was first setting the firewalld to run and confirming it (state says ”running”). Next part is where I set the port 22 to be permanently allowed in public-zone. If that –permanent-annotation would have been left out, the rould had dropped during the next boot.
Okay, now the firewall is set, it is time to create a new user and block remote access to root for security reasons.
In centos, it’s possible to do by following the steps taken from this guide:
https://www.digitalocean.com/community/tutorials/how-to-add-and-delete-users-on-a-centos-7-server
sudo adduser krister
for the new user, I need to initialize a password. A good password is at least 12 digits long and contains at least one of lower case letters, upper case letters, numbers and special characters.
sudo passwd krister
and finally, add the user into sudoers group
sudo gpasswd -a username wheel
next we try to login with this new user via ssh
ssh krister@207.154.226.166
and it works, now we can safely prevent login of the root user
sudoedit /etc/ssh/sshd_config
Here, I have to uncomment the following line and change the value to ”no”:
PermitRootLogin no
now, I have to restart the daemon to apply the changes
sudo service sshd restart
Next, I’ll test, what happens if I try to login as root via ssh:
xubuntu@xubuntu:~$ ssh root@207.154.226.166

root@207.154.226.166's password:

Permission denied, please try again.

root@207.154.226.166's password:

Permission denied, please try again.

root@207.154.226.166's password:
now it doesn’t allow me to log in as a root user anymore.
Make login without password possible
Next I’m going to create the ssh-keys and make it possible to login without using a password.
on Ubuntu Linux
first I need to create the key with command
ssh-keygen
which produces
Generating public/private rsa key pair.

Enter file in which to save the key (/home/xubuntu/.ssh/id_rsa):

Created directory '/home/xubuntu/.ssh'.

Enter passphrase (empty for no passphrase):

Enter same passphrase again:

Your identification has been saved in /home/xubuntu/.ssh/id_rsa.

Your public key has been saved in /home/xubuntu/.ssh/id_rsa.pub.

The key fingerprint is:

SHA256:9wiLA9ept4DUI5wn+dz1DjmkrbF+qMCBims26AygQeA xubuntu@xubuntu

The key's randomart image is:

+---[RSA 2048]----+

|.                |

|o                |

| E               |

|.  o + . .       |

|o . X = S +      |

|+o o @ = O =     |

|*   + B *.* o    |

|+=   . +.=.+     |

|=o.   .o=.  .    |

+----[SHA256]-----+
now I have the key, next I command the ssh-copy-id to send the public to the server and put it into ”authorized keys”-file.
xubuntu@xubuntu:~$ ssh-copy-id -i .ssh/id_rsa krister@207.154.226.166

/usr/bin/ssh-copy-id: INFO: Source of key(s) to be installed: ".ssh/id_rsa.pub"

/usr/bin/ssh-copy-id: INFO: attempting to log in with the new key(s), to filter out any that are already installed

/usr/bin/ssh-copy-id: INFO: 1 key(s) remain to be installed -- if you are prompted now it is to install the new keys

krister@207.154.226.166's password:
Number of key(s) added: 1
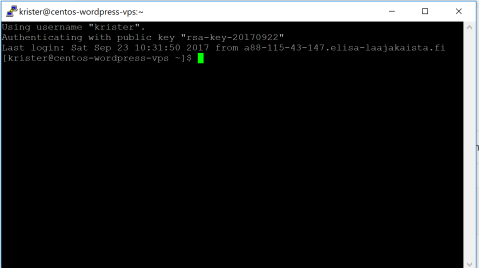
Now I try to login into the machine, with: ”ssh ’krister@207.154.226.166′”
and see, if the ssh daemon recognizes my rsa-key handshake.
xubuntu@xubuntu:~$ ssh krister@207.154.226.166

Last login: Fri Sep 22 13:28:59 2017 from pub-nat.haaga-helia.fi

[krister@wordpress-centos-vps ~]$
no password was asked so it works.
on windows
I’ll be following a tutorial from getfilecloud and use the tools provided by putty.org.
https://www.getfilecloud.com/blog/ssh-without-password-using-putty/
http://www.putty.org/
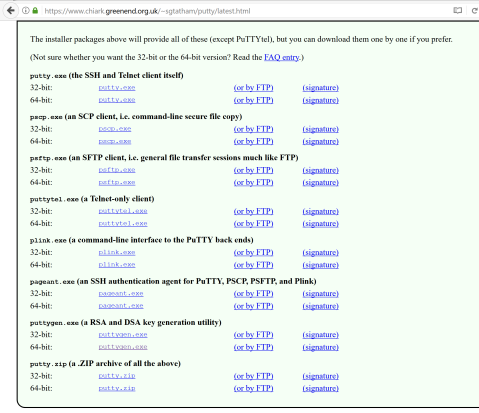
From here you need to download both putty.exe and puttygen.exe
first we need to create the keys, so let’s open up puttygen
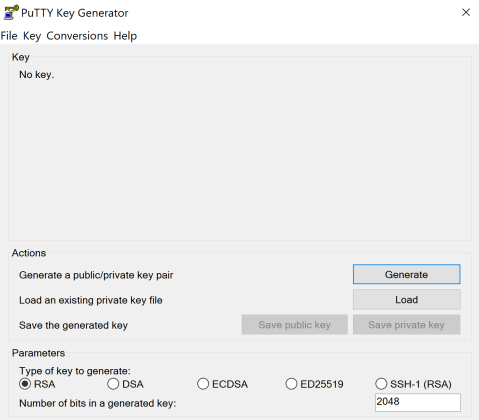
so first just click ”generate”
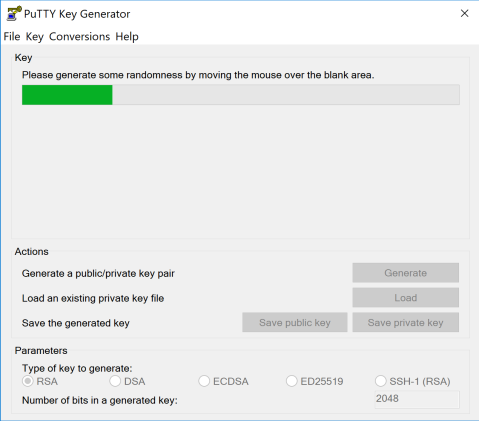
It’ll ask you to create some noise with mouse, so move the cursor until the bar finishes.
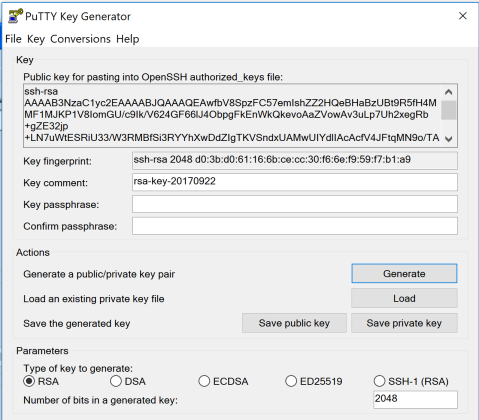
the keys are now generated and now you need to save them in a very safe space
open the public key with your favorite text editor
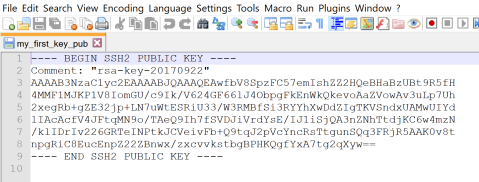
This is what your public key looks like. Now paint and copy all the stuff between start and end lines.
Next, start putty.exe
on ”hostname” field, type your user and ip-address in format user@ip-address and then click connect, the ssh-session will open. Enter your password when prompted.
create a new file with your favorite text editor in ~/.ssh/authorized_keys
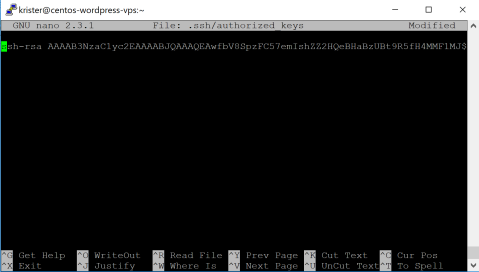
next, set the permissions
chmod 700 ~/.ssh

$ chmod 600 ~/.ssh/authorized_keys
Now I close my putty connection to try establishing it with the rsa-key
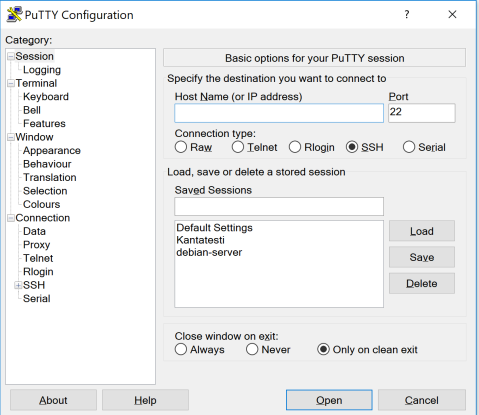
First thing is to click open the tab ”Auth” under ”SSH”, where I can choose the private key I want to use for this connection.
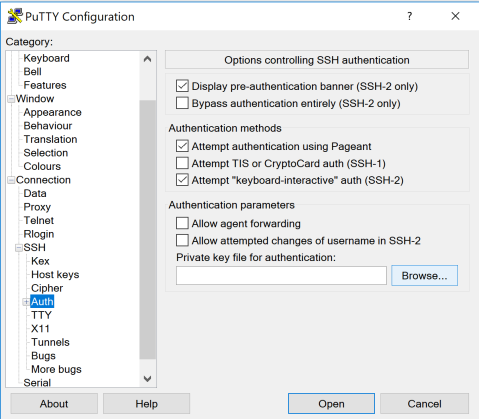
Next I go back to the ”session” tab and write down my username and ip-address, then save it as a session by writing name into ”saved session” – section and clicking ”save”.
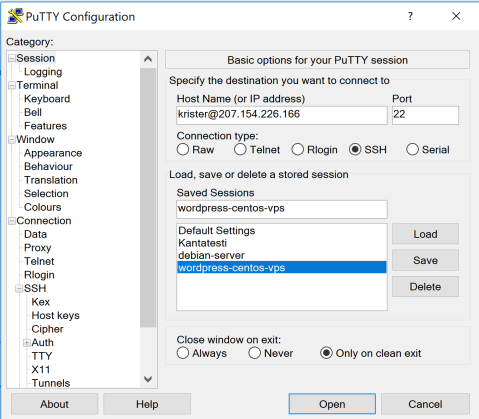
now the session is stored and everytime I open putty, I can restore these settings by choosing the session on the list and clicking ”load”
Now I click ”connect” to see if the server still prompts me the password.
And it works!
Checking the security logs
Before moving on to the LAMP, I’d like to check the security logs to see some cases of breach tryouts.
As we now, there’s tons of scanner bots amongst the real human crackers, who try to penetrate and occupy into servers. The easiest way to protect ourselves from the most common breaches is simply close all the unused ports and use strong passwords (the most secure way would be dropping the password authentication completely and stick with the ssh-key authentication, but I need to have a backup solution, if I happen to lose my private keys.)
In Centos, I can check the latest security logs by using tail
sudo tail /var/log/secure
It shows me this
Sep 23 11:24:25 centos-wordpress-vps sshd[4967]: PAM 2 more authentication failures; logname= uid=0 euid=0 tty=ssh ruser= rhost=118.212.132.227  user=root

Sep 23 11:24:51 centos-wordpress-vps sshd[4972]: reverse mapping checking getaddrinfo for 227.132.212.118.adsl-pool.jx.chinaunicom.com [118.212.132.227] failed - POSSIBLE BREAK-IN ATTEMPT!

Sep 23 11:24:52 centos-wordpress-vps sshd[4972]: pam_unix(sshd:auth): authentication failure; logname= uid=0 euid=0 tty=ssh ruser= rhost=118.212.132.227  user=root

Sep 23 11:24:52 centos-wordpress-vps sshd[4972]: pam_succeed_if(sshd:auth): requirement "uid >= 1000" not met by user "root"

Sep 23 11:24:54 centos-wordpress-vps sshd[4972]: Failed password for root from 118.212.132.227 port 24514 ssh2

Sep 23 11:24:54 centos-wordpress-vps sshd[4972]: pam_succeed_if(sshd:auth): requirement "uid >= 1000" not met by user "root"

Sep 23 11:24:56 centos-wordpress-vps sshd[4972]: Failed password for root from 118.212.132.227 port 24514 ssh2

Sep 23 11:24:56 centos-wordpress-vps sshd[4972]: pam_succeed_if(sshd:auth): requirement "uid >= 1000" not met by user "root"

Sep 23 11:24:58 centos-wordpress-vps sshd[4972]: Failed password for root from 118.212.132.227 port 24514 ssh2

Sep 23 11:24:58 centos-wordpress-vps sudo: krister : TTY=pts/0 ; PWD=/home/krister ; USER=root ; COMMAND=/bin/tail /var/log/secure
that last line obviously shows me (user krister) using root-session with sudo at /home/krister with command /bin/tail to the path /var/log/secure
the upper line seems to be someone knocking the port 24514 with ssh and false password for root. It’s probably just trying a list of the common passwords. Especially that is the obvious case since, it tries to access the same port with username root all the time.
Let’s see where that IP-address is from.
from http://terokarvinen.com/2017/aikataulu-linux-palvelimet-ict4tn021-4-ti-ja-5-to-alkusyksy-2017-5-op I can get two commands for investigation: geoiplookup and whois. The later one I need to install so I type
sudo yum install whois
next I check that ip addresses whois-information
[krister@centos-wordpress-vps ~]$ whois 118.212.132.227

% [whois.apnic.net]

% Whois data copyright terms    http://www.apnic.net/db/dbcopyright.html
% Information related to ’118.212.0.0 – 118.212.255.255’
% Abuse contact for ’118.212.0.0 – 118.212.255.255’ is ’hqs-ipabuse@chinaunicom.cn’
inetnum: 118.212.0.0 – 118.212.255.255
netname: UNICOM-JX
descr: China Unicom Jiangxi province network
descr: China Unicom
country: CN
admin-c: CH1302-AP
tech-c: CH1302-AP
status: ALLOCATED PORTABLE
remarks: service provider
remarks: ——————————————————–
remarks: To report network abuse, please contact mnt-irt
remarks: For troubleshooting, please contact tech-c and admin-c
remarks: Report invalid contact via http://www.apnic.net/invalidcontact
remarks: ——————————————————–
mnt-by: APNIC-HM
mnt-lower: MAINT-CNCGROUP-JX
mnt-routes: MAINT-CNCGROUP-RR
mnt-irt: IRT-CU-CN
changed: hm-changed@apnic.net 20071031
changed: hm-changed@apnic.net 20090508
source: APNIC
irt: IRT-CU-CN
address: No.21,Financial Street
address: Beijing,100033
address: P.R.China
e-mail: hqs-ipabuse@chinaunicom.cn
abuse-mailbox: hqs-ipabuse@chinaunicom.cn
admin-c: CH1302-AP
tech-c: CH1302-AP
auth: # Filtered
mnt-by: MAINT-CNCGROUP
changed: zhouxm@chinaunicom.cn 20101110
changed: hm-changed@apnic.net 20101116
changed: zhaoyz3@chinaunicom.cn 20170905
source: APNIC
person: ChinaUnicom Hostmaster
nic-hdl: CH1302-AP
e-mail: hqs-ipabuse@chinaunicom.cn
address: No.21,Jin-Rong Street
address: Beijing,100033
address: P.R.China
phone: +86-10-66259764
fax-no: +86-10-66259764
country: CN
changed: hqs-ipabuse@chinaunicom.cn 20090408
mnt-by: MAINT-CNCGROUP
changed: hm-changed@apnic.net 20170817
source: APNIC
% Information related to ’118.212.0.0/16AS4837’
route: 118.212.0.0/16
descr: CNC Group CHINA169 Jiangxi Province Network
country: CN
origin: AS4837
mnt-by: MAINT-CNCGROUP-RR
changed: abuse@cnc-noc.net 20080102
source: APNIC
% This query was served by the APNIC Whois Service version 1.88.15-37 (WHOIS-UK4)
Apparently the connection tryouts came from a Chinese internet provider from Beijing, which means, the source machine is probably some invidual hacker’s computer or a zombified machine, which is oppressed into spreading to the other machines with weak passwords.
Let’s try with the geoiplookup
 [krister@centos-wordpress-vps ~]$ geoiplookup 118.212.132.227

GeoIP Country Edition: CN, China
Yup, that pretty much confirms it.
Install rest of the lamp
I’m going to install LAMP into my new Centos 7 VPS with help of this digitalocean’s blog post https://www.digitalocean.com/community/tutorials/how-to-install-linux-apache-mysql-php-lamp-stack-on-centos-7
Linux
I have a running VPS with centos set up, so it can be marked ’done’.
Apache
an HTTP server. In Debian-based distros, the package is named simply as apache2, but in Red Hat -based distros, it’s httpd (HTTP Daemon)
so I can install it with command
sudo yum install httpd
The digitalocean blog says to start the service with systemctl-command because CentOS 7 relies entirely on SystemD, but luckily I know, that service-command, familiar from debian world, works here as well, because it redirects the command into SystemD.
[krister@centos-wordpress-vps ~]$ sudo service httpd start

Redirecting to /bin/systemctl start httpd.service
and next I’ll navigate to the server’s IP address to see if the apache2 is working.
But the browser throws ”The connection has timed out”
the reason is simple: the firewall is blocking access to the port 80, which apache is listening to.
I’ll just enable access to it by commanding firewalld
sudo firewall-cmd --zone=public --add-port=80/tcp
notice that I left out the permanent-flag. It’s because I want to enforce the traffic to flow through port 443, the https, instead of plain 80, the http. Until I have configured the ssl-settings, I need to rely on the non-encrypted http.
let’s try the browser again:
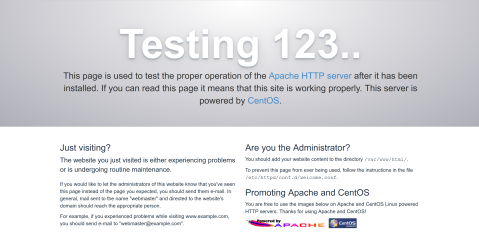
It works, now I can enable the user directory scan for html-pages.
First I’m going to enable httpd so it starts during a boot.
[krister@centos-wordpress-vps ~]$ sudo service httpd enable

[sudo] password for krister:

The service command supports only basic LSB actions (start, stop, restart, try-restart, reload, force-reload, status). For other actions, please try to use systemctl.

[krister@centos-wordpress-vps ~]$
aha, apparently the service-command doesn’t support enable here. Instead I have to type
[krister@centos-wordpress-vps ~]$ sudo systemctl enable httpd.service

Created symlink from /etc/systemd/system/multi-user.target.wants/httpd.service t         o /usr/lib/systemd/system/httpd.service.

[krister@centos-wordpress-vps ~]$
The next thing is to enable user directories. Unfortunately, the ”a2enmod”-command, familiar from debian based OS:es, is not available on Centos, but luckily, based on this blog post https://www.server-world.info/en/note?os=CentOS_7&p=httpd&f=5, I can do the modification manually.
sudo nano /etc/httpd/conf.d/userdir.conf
As it says, I need to confirm those permissions said in comments. But first I need to comment out ”UserDir disabled”, uncomment ”UserDir public_html”, comment out both ”AllowOverride” and ”Options” parts and write instead ”AllowOverride All”, ”Options none”

now just hit ctrl + x and save changes
Next thing is to restart the apache2-server
sudo service httpd restart
Next I’m going to create the the public_html-folder and index.html-file to see if the userdir works. Also I’m going to set the permissions for the folders.
chmod 711 /home/krister
mkdir ~/public_html
chmod 755 ~/public_html
nano ~/public_html/index.html
Let’s start with just this phrase, so we can verify it works.
and it works
Mysql
MySQL is pretty straightforward.
So first, let’s install mysql-server.
[krister@centos-wordpress-vps ~]$ sudo yum install mysql-server

[sudo] password for krister:

Loaded plugins: fastestmirror

Loading mirror speeds from cached hostfile

* base: mirror.imt-systems.com

* extras: mirror.23media.de

* updates: mirror.rackspeed.de

No package mysql-server available.

Error: Nothing to do

[krister@centos-wordpress-vps ~]$
Apparently the mysql is completely dropped from yum repositories in favor of mariadb (in comparison: aptitude has both of them available)
so, let’s change it into
sudo yum install mariadb-server
and start it
sudo service mariadb start
sudo systemctl enable mariadb.service
on comparison of the mysql installation, you won’t set the root password during the installation. To cover this, I’m going to run the following script
sudo mysql_secure_installation
[krister@centos-wordpress-vps ~]$ sudo mysql_secure_installation
NOTE: RUNNING ALL PARTS OF THIS SCRIPT IS RECOMMENDED FOR ALL MariaDB
SERVERS IN PRODUCTION USE! PLEASE READ EACH STEP CAREFULLY!
In order to log into MariaDB to secure it, we’ll need the current
password for the root user. If you’ve just installed MariaDB, and
you haven’t set the root password yet, the password will be blank,
so you should just press enter here.
Enter current password for root (enter for none):
OK, successfully used password, moving on…
Setting the root password ensures that nobody can log into the MariaDB
root user without the proper authorisation.
Set root password? [Y/n] y
New password:
Re-enter new password:
Password updated successfully!
Reloading privilege tables..
… Success!
By default, a MariaDB installation has an anonymous user, allowing anyone
to log into MariaDB without having to have a user account created for
them. This is intended only for testing, and to make the installation
go a bit smoother. You should remove them before moving into a
production environment.
Remove anonymous users? [Y/n]
… Success!
Normally, root should only be allowed to connect from ’localhost’. This
ensures that someone cannot guess at the root password from the network.
Disallow root login remotely? [Y/n]
… Success!
By default, MariaDB comes with a database named ’test’ that anyone can
access. This is also intended only for testing, and should be removed
before moving into a production environment.
Remove test database and access to it? [Y/n]
– Dropping test database…
… Success!
– Removing privileges on test database…
… Success!
Reloading the privilege tables will ensure that all changes made so far
will take effect immediately.
Reload privilege tables now? [Y/n]
… Success!
Cleaning up…
All done! If you’ve completed all of the above steps, your MariaDB
installation should now be secure.
Thanks for using MariaDB!
[krister@centos-wordpress-vps ~]$
Just to be clear, I chose to set root password, remove anonymous users, remove root remote login and drop the test database, which strengthen the security, but the most important reason to run this script was to set the root password.
let’s try to login into the mariadb-server
mysql -u root -p
 Welcome to the MariaDB monitor.  Commands end with ; or \g.

Your MariaDB connection id is 10

Server version: 5.5.56-MariaDB MariaDB Server
Copyright (c) 2000, 2017, Oracle, MariaDB Corporation Ab and others.
Type ’help;’ or ’\h’ for help. Type ’\c’ to clear the current input statement.
MariaDB [(none)]>
This ensures that the mariadb installation works.
Since I’m going to install WordPress to my vps later, I could create the database and dedicate a user for it, since I’m now logged in.
MariaDB [(none)]> create database wordpress;

Query OK, 1 row affected (0.00 sec)
next I’ll create a user with privilege to modify on a database ”wordpress”
with commands ”create user ’username’@’location’ identified by ’password’;”
and grant the privileges with ”grant all privileges on database.* to ’username’@’location'”
 MariaDB [(none)]> create user 'wordpress'@'%' identified by 'password';

Query OK, 0 rows affected (0.01 sec)
(note: I replaced the password for this example because I don’t want to share it publicly. Make sure to use passwords with at least 12 characters, both uppercase and lowercase letters, numbers and special characters)
MariaDB [(none)]> grant all privileges on wordpress.* to 'wordpress'@'%';

Query OK, 0 rows affected (0.00 sec)
now, it’s set so I can move to the next phase
Install PHP
In Red hat distros, the php-package already contains a module for apache2 server, so the PHP-package is all we need for the necessity. Of course I need to have database-connections set for the wordpress, therefore I also need package php-mysql
sudo yum install php php-mysql
The next thing before testing out the php is to enable it on public_html. This can be simply done in the same userdir.conf-file we edited earlier.
According to the following forum post https://serverfault.com/questions/172217/how-do-i-get-php-to-work-with-userdir, all you have to do is put this line inside the -tag: ”AddHandler fcgid-script .php”
sudo nano /etc/httpd/conf.d/userdir.conf
Next thing is to test out the php-functionality.
First thing is to rename the index.html-file into index.php
mv ~/public_html/index.html ~/public_html/index.php
next thing is to add some php-code inside the file
nano public_html/index.php
I just modify the old ”Hello world!”-phrase into ””, which does exactly the same thing, except showing blank page if the php is not installed properly.
Now I just open my browser and navigate to address ”207.154.226.166/~krister/”
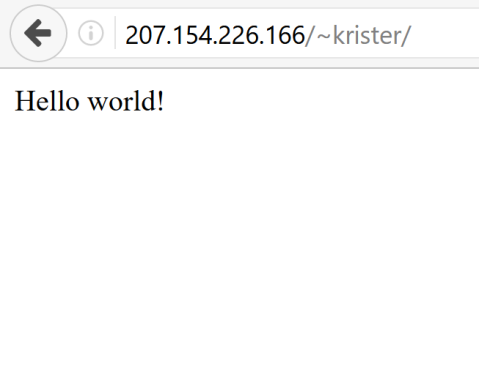
and it works!
Now I have a full-running LAMP initialized
Install WordPress
There’s a good blog-post about installing wordpress available https://tuomassippola.wordpress.com/2014/03/09/wordpressin-asennus/ so I’m going to check some parts out of it.
First I’m going to create a dedicated folder into my public_html-folder.
mkdir ~/public_html/wordpress
Since wordpress is not available in public repositories, I need to download and extract the latest tarball from their site.
wget https://wordpress.org/latest.tar.gz
tar xf latest.tar.gz
Tar extracted all the files into a ”wordpress”-folder, now I’m going to move the content inside into my public_html-folder
mv ~/wordpress/* ~/public_html/wordpress
Now the content is in it’s place, so I can launch the installer via browser by navigating to the address ”207.154.226.166/~krister/wordpress
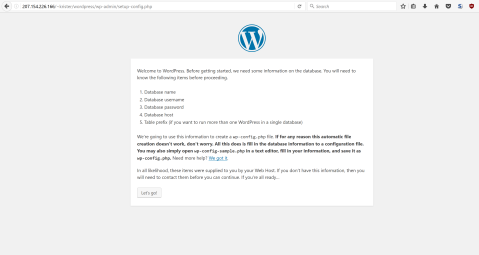
okay, seems working, I’ll click the ”let’s go”-button

Okay, now it asks me the credentials and database name for the database access. Good thing I created those earlier. The prefix is just fine and since the mariadb-server is located into the same vps as the wordpress installation is, localhost will be able to access it with no problem.
I just fill in the information and click ”submit”

Apparently it wasn’t able to write the config file. Well, I just copy the provided content and then create the file
nano ~/public_html/wordpress/wp-config.php
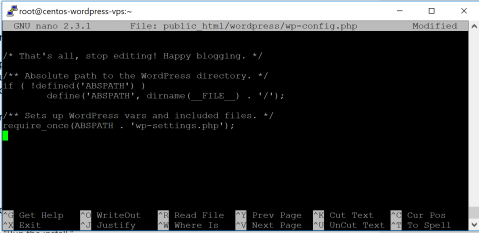
Now just ctrl + x and back to the installer.
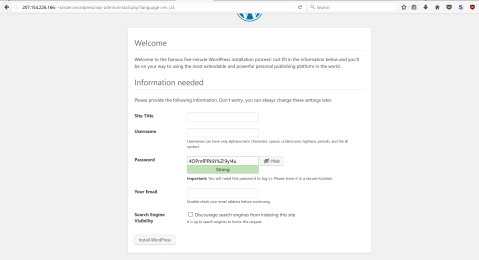
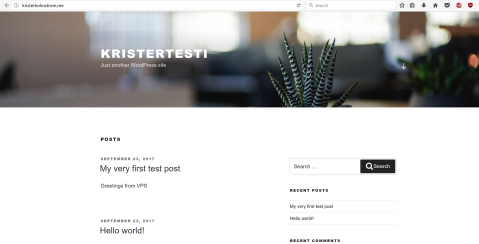
Now it’s time to create my user and the name of the site. Apparently it has already generated me a password, which I believe is instantly expiring one.
For now, I’m just going to put the site name as ”KristerTesti” and change it later. I fill the username and the email and leave ”Discourage search engines from indexing this site” untapped, because I’m probably going to move my wordpress blog into my vps and it’d be nice if the search engines start to re-index into my new blog server.
Lastly I tap the ”install wordpress” -button.
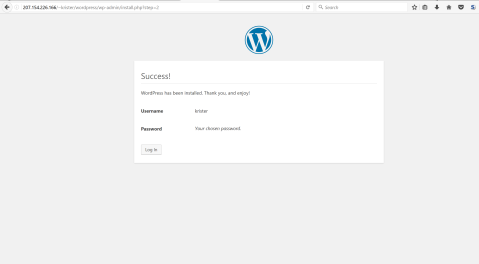
It took less than a second to finish.
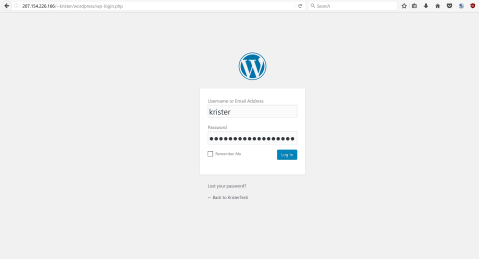
Now let’s try logging in.
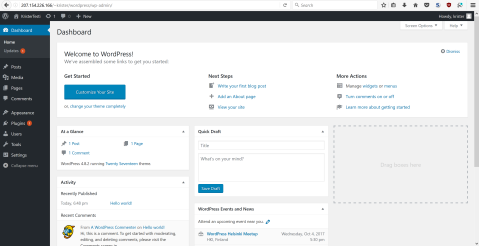
Now I managed to get into the admin panel.
Let’s test the actual usage by posting a test post.
I’ll navigate to ”posts” -> ”add new”
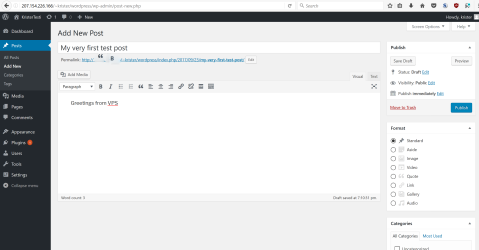
And now to publish from the right panel and see how it looks.
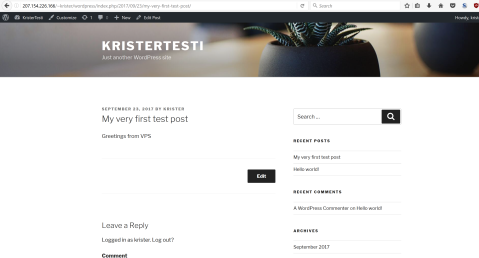
Looks great! Of course there’s still some modifications required for the template and overall look, but at least the base installation works now.
Buy and point domain name
I happen to have the github education pack, which provides me a year use of .me-domain, so I’ll go claim that offer now.

I’m going to try first with my lastname, so let’s search for holmstrom.me
Apparently it was already taken, so I’ll try with kristerholmstrom.me next
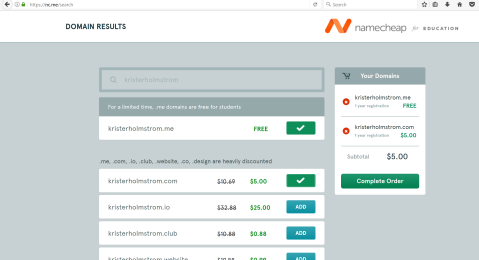
Luckily it’s still available, and kristerholmstrom.com is pretty cheap too. Better register that now before it’s gone.
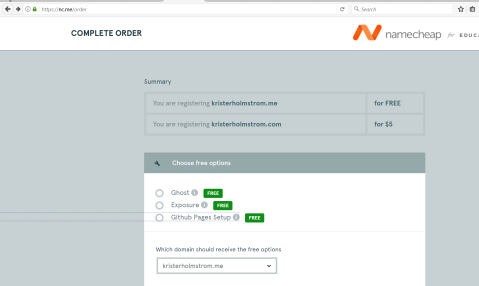
It seems to provide some free services, which are
Ghost – open source online publication platform made with node.js
Exposure – a platform for sharing photo stories
Github pages – tool for generating a site around github project
Since I’m going to point this domaine to my wordpress server, these offers are not necessary for me. Especially that ghost platform I could just install to my server if I happen to need one.
Apparently it forces me to pick one of those, so I’ll just pick ”github pages”, maybe it comes handy later.
Next step is to create a new account and what I find weird is that it doesn’t accept nordic characters on my last name. Even more odd is that since there’s a dropdown menu for mobile phone national codes, which has the nordic countries, so why limit the characters? Maybe the character set of their database is using Latin-1.
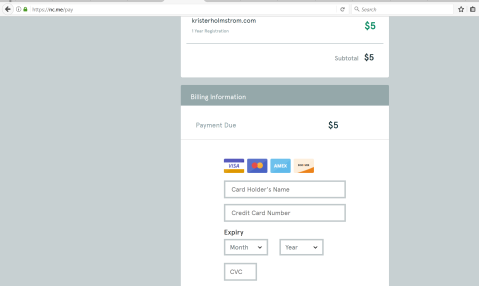
Here it requires me to add my card information. What is the most interesting part is that it doesn’t offer any other payment methods like paypal.
After paying and confirming my email, I should be able to modify the dns-settings of my new domains.
Okay, so this is what the management page looks like. Next I should check the options for dns-settings. I’ll click ”manage” at kristerholmstrom.me
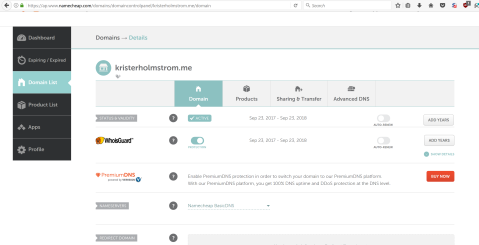
At the manage-page, the obvious place to change the DNS-settins is under ”Advanced DNS” tab
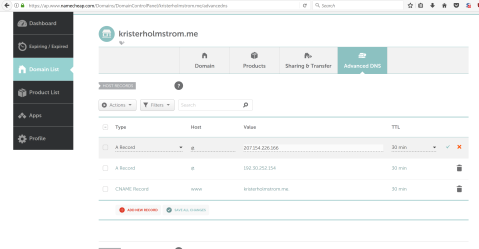
Now here’s where the magics happen. Basicly all I need to do is just change that A-record to point at IP 207.154.226.166, which is my vps public address. Now I just save the changes and see how it looks.
Now it just shows the blank page so apparently it’s not set up yet. (it might take some time before the dns-name record updates to upward).
I just let it be overnight and at the morning, when I tested out the browser again, this shows up
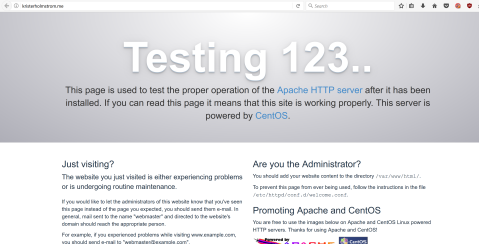
It works now, but of course it just shows the default apache test page. Let’s change it so that the ”root” is my wordpress home page.
Luckily there’s a blog post about this topic already https://www.digitalocean.com/community/tutorials/how-to-set-up-apache-virtual-hosts-on-centos-7
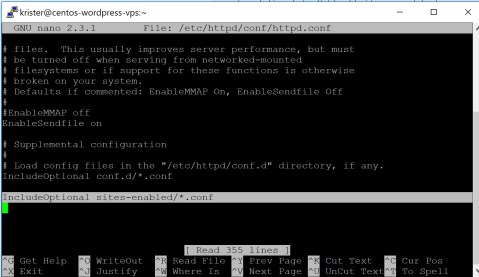
So first, I’m going to create the ”sites-available”-folder, where the available
configurations can be stored.
sudo mkdir /etc/httpd/sites-enabled
Then I’m going to add IncludeOptional sites-enabled/*.conf to the httpd.conf
sudo nano /etc/httpd/conf/httpd.conf
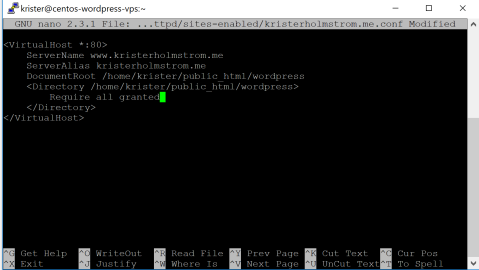
Next I’m going to create a config file, that will set my wordpress page inside /home/krister/public_html/wordpress/ to the root level.
I just name the config file as the domain name, so it’s easier to track later, which config affects in which domain.
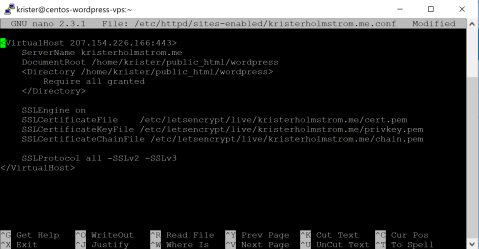
sudo nano /etc/httpd/sites-enabled/kristerholmstrom.me.conf
Okay, now it’s time to restart the httpd-service and see the changes
sudo service httpd restart
Redirecting to /bin/systemctl restart httpd.service

[krister@centos-wordpress-vps ~]$
Now I navigate to kristerholmstrom.me with my browser
it works!
Setting up SSL-certificates with Let’s Encrypt
It’s probably the easiest way to use an automated ACME-bot provided by EFF, to serve the certificates and I’m bit curious how it works anyways. The instructions are available for all kinds of server platforms and for this test case https://certbot.eff.org/#centosrhel7-apache, I’ll be using Centos 7 with apache2, since that’s what I have now set up.
The acme-installation is available on EPEL-repository, so I have to first enable it.
sudo yum -y install epel-release
and then I can install certbot-apache
sudo yum -y install certbot-apache
Now I have the certbot installed. Next I need to check the commands from this manual https://certbot.eff.org/docs/using.html#certbot-commands
Apparently, since I have configured my public_html-folder to be the root directory, I need to pick the certonly-parameter and specify the path to the virtualhost content in the –webroot attribute. With -d flag, I can define the CNAME-value I want to use the certificates with. In my case, it’s the domain name I pointed earlier at this server.
certbot certonly --webroot -w /home/krister/public_html/wordpress -d kristerholmstrom.me
after asking about email address and agreeing with the terms of condition, I need to install the ssl-module on apache and configure port 443 to direct to the wordpress-folder. Following this blog https://www.digitalocean.com/community/tutorials/how-to-create-an-ssl-certificate-on-apache-for-centos-7
I’m going to install mod_ssl
sudo yum install mod_ssl
Apparently it was already installed.
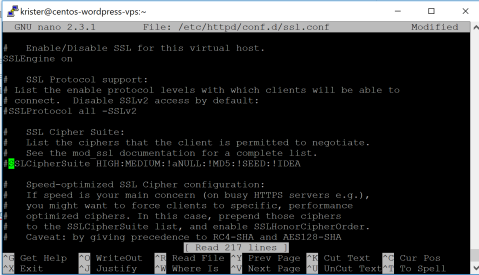
Now, according to the tutorial, I need to comment out the SSLProtocol and SSLCipherSuite from the ssl.conf-file.
sudo nano /etc/httpd/conf.d/ssl.conf
Next thing is to configure https-virtualhost to the config file.
sudo nano /etc/httpd/sites-enabled/kristerholmstrom.me.conf
and add here a new virtualroot-definition
it’s also recommended to copy-paste the following settings at the end of the ssl.conf-file
sudo nano /etc/httpd/conf.d/ssl.conf
# Begin copied text

# from https://cipherli.st/

# and https://raymii.org/s/tutorials/Strong_SSL_Security_On_Apache2.html
SSLCipherSuite EECDH+AESGCM:EDH+AESGCM:AES256+EECDH:AES256+EDH
SSLProtocol All -SSLv2 -SSLv3
SSLHonorCipherOrder On
# Disable preloading HSTS for now. You can use the commented out header line that includes
# the "preload" directive if you understand the implications.
#Header always set Strict-Transport-Security "max-age=63072000; includeSubdomains; preload"
Header always set Strict-Transport-Security "max-age=63072000; includeSubdomains"
Header always set X-Frame-Options DENY
Header always set X-Content-Type-Options nosniff
# Requires Apache >= 2.4
SSLCompression off
SSLUseStapling on
SSLStaplingCache "shmcb:logs/stapling-cache(150000)"
# Requires Apache >= 2.4.11
# SSLSessionTickets Off
Next thing is to run a configuration sanity test
sudo apachectl configtest
AH00558: httpd: Could not reliably determine the server's fully qualified domain name, using ::1. Set the 'ServerName' directive globally to suppress this message

Syntax OK
ok, it complains about missing global servername, but that shouldn’t matter since I have my custom configuration. ”Syntax OK” means it compiles otherwise fine.
Next thing is to restart the httpd-daemon
sudo service httpd restart
No complains from that.
Next thing is to open the ssl-port from firewalld
sudo firewall-cmd --zone=public --permanent --add-port=443/tcp
now let’s open the browser and navigate to address https://kristerholmstrom.me
Okay, it timed out so obviously I’m missing something.
Checking from the ssl_request_log, I was able to find that the certificate didn’t load properly. After googling around, I found this forum post with similiar situation https://unix.stackexchange.com/questions/358089/apache-ssl-server-cert-does-not-include-id-which-matches-server-name and the response says I should use the bot’s autoconfig even with a virtualhost-configuration.
So then I command
sudo certbot --apache
Saving debug log to /var/log/letsencrypt/letsencrypt.log

Plugins selected: Authenticator apache, Installer apache

Starting new HTTPS connection (1): acme-v01.api.letsencrypt.org
Which names would you like to activate HTTPS for?
——————————————————————————-
1: kristerholmstrom.me
2: http://www.kristerholmstrom.me
——————————————————————————-
Select the appropriate numbers separated by commas and/or spaces, or leave input
blank to select all options shown (Enter ’c’ to cancel):
I’m going to choose 1
You have an existing certificate that has exactly the same domains or certificate name you requested and isn't close to expiry.

(ref: /etc/letsencrypt/renewal/kristerholmstrom.me.conf)
What would you like to do?
——————————————————————————-
1: Attempt to reinstall this existing certificate
2: Renew & replace the cert (limit ~5 per 7 days)
——————————————————————————-
Select the appropriate number [1-2] then [enter] (press ’c’ to cancel):
I’ll reinstall the existing one, therefore I pick number 1
Keeping the existing certificate

Deploying Certificate for kristerholmstrom.me to VirtualHost /etc/httpd/sites-enabled/kristerholmstrom.me.conf
Please choose whether or not to redirect HTTP traffic to HTTPS, removing HTTP access.
——————————————————————————-
1: No redirect – Make no further changes to the webserver configuration.
2: Redirect – Make all requests redirect to secure HTTPS access. Choose this for
new sites, or if you’re confident your site works on HTTPS. You can undo this
change by editing your web server’s configuration.
——————————————————————————-
Select the appropriate number [1-2] then [enter] (press ’c’ to cancel):
I want the redirection, so I pick number 2
Failed redirect for kristerholmstrom.me

Unable to set enhancement redirect for kristerholmstrom.me

Unable to find corresponding HTTP vhost; Unable to create one as intended addresses conflict; Current configuration does not support automated redirection
IMPORTANT NOTES:
– We were unable to set up enhancement redirect for your server,
however, we successfully installed your certificate.
– Congratulations! Your certificate and chain have been saved at:
/etc/letsencrypt/live/kristerholmstrom.me/fullchain.pem
Your key file has been saved at:
/etc/letsencrypt/live/kristerholmstrom.me/privkey.pem
Your cert will expire on 2017-12-23. To obtain a new or tweaked
version of this certificate in the future, simply run certbot again
with the ”certonly” option. To non-interactively renew *all* of
your certificates, run ”certbot renew”
[krister@centos-wordpress-vps ~]$
Okay, some error occurred and apparently, the browser still shows timeout.
On this post at Acme-bot’s github page https://github.com/certbot/certbot/issues/3461, they say that it might be a bug. On digitalocean’s blog, it’s recommended to use the default ssl.conf-file instead of custom conf. Let’s try that out and copy the content of kristerholmstrom.me.conf into ssl.conf
So I just keep the -tag but change everything else to match.
Now restart the httpd and try it again.
Still timeout, but the record in log says
[Sun Sep 24 15:14:55.409568 2017] [ssl:warn] [pid 14849] AH01909: RSA certificate configured for www.kristerholmstrom.me:443 does NOT include an ID which matches the server name
it might be that the http://www.-prefix is not compatible, let’s remove that from the virtualhost-configuration.
apparently, it didn’t work out either, so I’ll have to finish up this topic later.
Creating a Xubuntu boot stick on Windows 10 with Rufus
This blog post is made from an exercise of Haaga-Helia Course Linux as a server (Linux palvelimena) hosted by Tero Karvinen.
The exercise contains the following parts:
- Make your own Linux live boot stick. Try it with some other computer than the ones in school lab. This part doesn’t require installing the OS on your computer – if you do so, make sure you do proper backups first
- List of the hardware of your test computer (’sudo lshw -short -sanitize’)
- Install three new software that are new to you. Try each of them in their mainly tasks
- Check what licenses the installed softwares use. Explain shortly, what rights and duties those licenses provide for you as an end-user
- List the software you use for your daily usage (ie. MS Word), their main purpose (ie. text preparation) and a controversial free Linux-software (ie. Libreoffice Writer). If a program doesn’t have any free Linux-counterparts, list it anyway.
First I start with creating the live boot stick and test the booting with my Lenovo Thinkpad T570 laptop and windows 10 installed (secure boot is already turned off)
Sat 25.8.2017 18:49:00
Started with downloading a latest image of a Xubuntu OS from the xubuntu website.
I’m going to pick the latest LTS-release availabe and use an HTTP-download source from Sweden proxy. The latest stable 64-bit release appears to be xubuntu-16.04.3-desktop-amd64.iso
19:15:00
The download took total of 13 minutes for a 3.7 Gb ISO-file, so apparently it’s a pretty slow to fetch an image file via HTTP-download, since it’s only provide from a one source at a time. During the download, the average download bandwith jumped between 3-8 Mbps.
Now it’s time to install an USB live stick creator application and, for Windows 10 operating system I’m currently using, I chose Rufus not only because it’s free and open source application, but also the UI is very simplified and mimics
the standard window of the Windows drive property popup, which makes it more intuitive to use in the Windows environment.
19:27:00
after downloading, I tried to open Rufus, but for some reason, it seems to hang on the background and doesn’t seem to load any visible UI. Even the task manager is unable to kill the process, so I believe the startup process is stuck somewhere.
After looking around the cause, I found out that the File History software I enabled earlier, before starting to studying this case, is still writing a mirror copy of the current personal files into my external drive and does that reeeally slowly
(as any other windows pre-installed backup program, it doesn’t show any progress bar to estimate, when it would be done with it’s job or at least indicate, it’s not
stuck in). After killing the backup process (I’ll just finish it up with some other tool later) Rufus started to work again, so I believe it had hard time on identifying
my external hdd during the backup process.
Next thing would have been finding the path of my downloaded Xubuntu iso-file, but after checking the download history, I found out that it apparently failed after all. This time I chose to download a more trustworthy torrent file and start a cluster download by using this very good, open source bittorrent-client Deluge, which is available on multiple
platforms, including several Linux distros, Mac OSX, Windows and FreeBSD
21:52:00
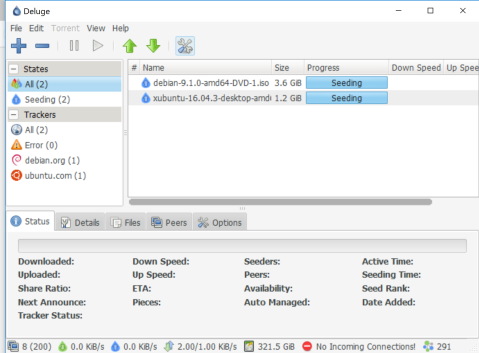
after having a break, I noticed my torrent-download being completed and it turned into a seeding mode.
Now back to Rufus..
21:54:00
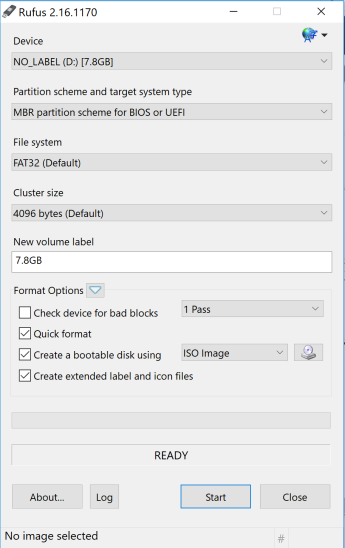
From the screenshot, you can see that I have a 7.8GB sized USB stick attached into a D- drive letter and for a partition scheme I’ve chosen ”MBR partition scheme for BIOS or UEFI” so it can support both BIOS and UEFi boot options.
”File System” has to be FAT32, otherwise it won’t support partitions sized over 1GB.
”Cluster Size” of 4kb is just fine, since I don’t happen to have a volume over 16TB.
”New Volume Label” is fine with 7.8Gb, therefore it uses the entire capacity of the usb stick.
”create a bootable stick with” will be ISO Image, since the downloaded file is formatted with ISO-packaging. By clicking the the disc image next to the dropdown menu, I can choosethe path to the ISO-file.
here I’m going to pick the Xubuntu image I torrented.
now it says ”Using image: xubuntu-16.04.3-desktop-amd64.iso” at the bottom, which means we are ready to start burning, so I just click ”Start” and Rufus gives me the following popup:
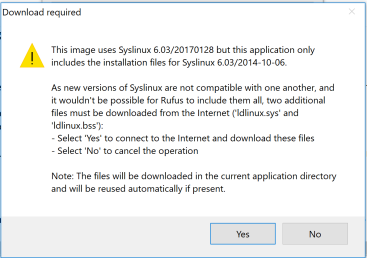
apparently Rufus is capable of analyzing the bootloader used by the chosen image, and now it recommends me to connect internet for downloading the most
latest version of syslinux-bootloader. Probably this is not recommended, since a bootloader is often made bootable for that certain iso-file, but
just out of curiosity I’d like to see, how the Rufus handle such situation, so I just click ”yes”
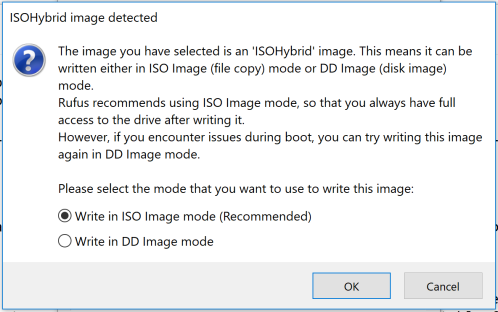
Now the Rufus is telling me that the file is typed as ”ISOHybrid” and I can burn it as ISO-mode or DD-mode. Here I believe it’s referring to a dd-application
from unix operating systems, that is used for writing disks and disk images bit-by-bit into a chosen output (i.e. another disk). Therefore I’m curious to see
this ISO-option it’s offering here.
22:43:00
Now the Rufus seems to be ready with writing the ISO-file and to verify that, we can look inside the drive
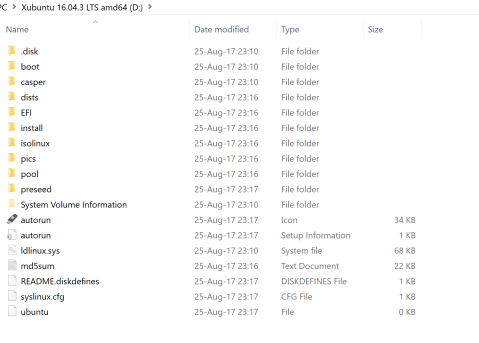
boot stick seems to be ready for the boot test. I have already disabled secure boot on my laptop, so I can try immediately to boot with the stick
23:01:00

I was able to boot, but the resolution of the screen seems to be a bit outfitted. Probably I need to install some external graphic drivers to support Nvidia GPU.
23:05:00
The next thing is to test out the hardware recognition by using the following command
xubuntu@xubuntu:~$ sudo lshw -short -sanitize
H/W path Device Class Description
==============================================================
system 20H9004MMX (LENOVO_MT_20H9_BU
/0 bus 20H9004MMX
/0/3 memory 16GiB System Memory
/0/3/0 memory 8GiB SODIMM Synchronous 2133
/0/3/1 memory 8GiB SODIMM Synchronous 2133
/0/7 memory 128KiB L1 cache
/0/8 memory 512KiB L2 cache
/0/9 memory 4MiB L3 cache
/0/a processor Intel(R) Core(TM) i7-7500U CP
/0/b memory 128KiB BIOS
/0/100 bridge Intel Corporation
/0/100/2 display Intel Corporation
/0/100/8 generic Sky Lake Gaussian Mixture Mod
/0/100/14 bus Intel Corporation
/0/100/14/0 usb1 bus xHCI Host Controller
/0/100/14/0/1 input USB Receiver
/0/100/14/0/2 generic LG-H870
/0/100/14/0/3 generic EMV Smartcard Reader
/0/100/14/0/4 scsi1 storage DataTraveler 2.0
/0/100/14/0/4/0.0.0 /dev/sdb disk 7756MB SCSI Disk
/0/100/14/0/4/0.0.0/1 /dev/sdb1 volume 7395MiB Windows FAT volume
/0/100/14/0/5 multimedia Integrated IR Camera
/0/100/14/0/6 communication L831-EAU-00
/0/100/14/0/7 communication Bluetooth wireless interface
/0/100/14/0/8 multimedia Integrated Camera
/0/100/14/0/9 generic Generic USB device
/0/100/14/1 usb2 bus xHCI Host Controller
/0/100/14/1/3 scsi0 storage USB3.0-CRW
/0/100/14/1/3/0.0.0 /dev/sda disk SD/MMC
/0/100/14/1/3/0.0.0/0 /dev/sda disk waw
/0/100/14.2 generic Intel Corporation
/0/100/16 communication Intel Corporation
/0/100/1c bridge Intel Corporation
/0/100/1c/0 display GM108M [GeForce 940MX]
/0/100/1c.6 bridge Intel Corporation
/0/100/1c.6/0 wlp4s0 network Intel Corporation
/0/100/1d bridge Intel Corporation
/0/100/1d.2 bridge Intel Corporation
/0/100/1d.2/0 storage Samsung Electronics Co Ltd
/0/100/1f bridge Intel Corporation
/0/100/1f.2 memory Memory controller
/0/100/1f.3 multimedia Intel Corporation
/0/100/1f.4 bus Intel Corporation
/0/100/1f.6 enp0s31f6 network Ethernet Connection (4) I219-
/1 power 00UR892
/2 power 01AV422
/3 wwp0s20f0u6 network Ethernet interface
Apparently it shows the system using the external Nvidia GeForce 940MX chip for graphics display, so that confirms that Xubuntu is missing the proper Nvidia drivers. I have to note that when I’m about to actually install a Linux distro on this laptop.
The next step is to install 3 new software by using a package manager,
so we start with sudo apt-get update.
I have to say, I’ve been using Linux, and especially Ubuntu, for a several years, so I find it hard to think of any new software I haven’t yet installed, so I just ended up looking for the most favorite programs listed on an Internet top ranking lists like this one http://www.omgubuntu.co.uk/2016/12/21-must-have-apps-ubuntu
and pick 3 software that I haven’t yet heard of.
After looking for a while, I ended up picking these three candidates:
– NeoFetch
– Ubuntu cleaner
– Clementine Music Player
Apparently for Neofetch, there’s no official Aptitude repository available, so I have to deal with the installation in an old-fashioned way: downloading sources packed in a tarball:
1. wget https://github.com/dylanaraps/neofetch/archive/3.2.0.tar.gz
2. tar xzfv 3.2.0.tar.gz unzipped neofetch-3.2.0 folder containing the actual source
3. cd neofetch-3.2.0 && ./neofetch makes it run
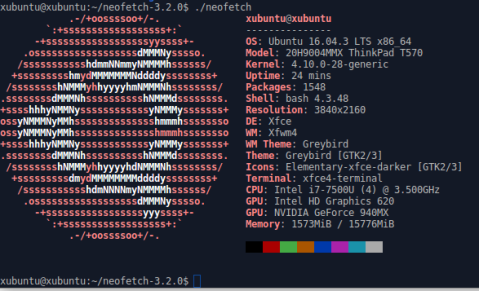
I have to admit, it’s pretty clear and works!
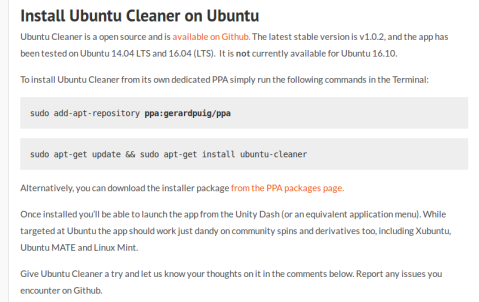
the next software is called Ubuntu Cleaner and again, this candidate doesn’t have any official installation repo on Aptitude,
but it does offer a custom ppa, if you trust them enough. You can also download the actual deb-package or sources from their github page.
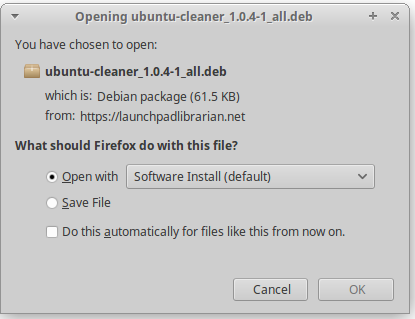
Let’s try the deb-package, you can either use software center to let it install the package, or simply use command dpkg -i ubuntu-cleaner_1.0.4-1_all.deb
First I tried opening the deb-file with Software Center (picture above), but the install button was unresponsive for some unknown reason, so I ended up using terminal and dpkg-command.
when running dpkg, it encountered a problem with unmet dependencies, but those can be installed by calling sudo apt-get -f install and then dpkg -i ubuntu-cleaner_1.0.4-1_all.deb again.
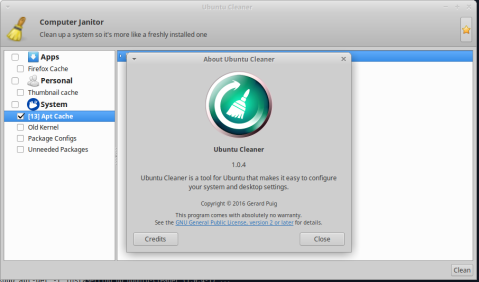
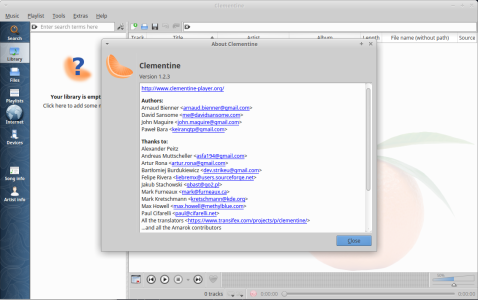
clementine is the last application and it was available on the official repos. I just commanded sudo apt-get install clementine and it was immediately ready to use. Tested out a sample music file and it appears to play music, so at least my speakers do work.
Continuing the steps with identifying the licenses of the previously installed three softwares.
first, the Ubuntu Cleaner says on it’s github page, that the software is licensed with GPLv3.
NeoFetch on the other hand says on their github page, that it’s licensed under MIT , which makes it possible for me to release my own modified version of this app as a closed propiertary software.
Clementine says on their web page https://www.clementine-player.org/ that it’s licensed with GPLv3
For GPLv3 softwares, as a user, I have the four principles as a rights to use these products (run,study, modify, redistribute and sell copies), but it means also
that I have to pass these rights to my modified, redistributed product as well. With MIT-license, I can also take the sources, make a modified application
and keep the sources to myself if I want and relicense the software I have made.
The next task is to list my mostly used applications and their alternatives on free linux-side.
The softwares I mostly use are work-related stuff, which are
– skype for business
– Intellij IDEA
– slack
– Telegram
For skype for business, apache seems to have it’s own openmeetings teleconference application with the Apache Software License version 2.0
Intellij IDEA Community Edition is published under Apache Software License 2.0 and it’s available on windows, osx and linux. The community edition, on the other hand, doesn’t support Java and Spring development, therefore a true alternative would be an easyeclipse , which combines open parts of the Eclipse IDE and the available open source plugins and distributes the migration under GPL-license.
Slack is obviosly not a free software and after googling around, I happened to find a chat-client, that advertises itself as an open-source alternative for slack and it’s called MatterMost. apparently, it’s community version is licensed under MIT.
Telegram provides the source codes for all of their client applications https://telegram.org/apps with GPLv2 licenses for Android, iOS, OSX, WP and Telegram CLI and GPLv3 for web browser client, Desktop client (OSX,Windows,Linux). Therefore there is no need to find an alternative for this product.
Arch Linuxin asennus

Asensin Oraclen virtualboxin kokeillakseni Arch linuxin asentamista. Päätin samalla kirjoittaa asennusvaiheista artikkelin, jotta muut voivat kokeilla samaa seuraamalla jalanjälkiäni. Vaiheittaiset ohjeet löytyvät sivulta https://wiki.archlinux.org/index.php/Installation_Guide
Suosittelen Arch linuksin asentamista muutaman kerran virtualboxille ennen kovalevylle asentamista, jotta asennuksen kaikki vaiheet tulevat varmasti tutuksi, asennus menee varmasti oikein ja mahdolliset ongelmat tulevat ilmi turvallisesti virtuaaliympäristössä.
ALOITUS
levykuva on ladattavissa täältä: https://www.archlinux.org/download/
– kun levykuva on ympätty ja järjestelmä käynnistetty, valitse live-valikosta vaihtoehto: boot Arch linux (i386)(tai (x86-64) jos käytät 64-bittistä).

seuraavaksi avautuu Arch linuxin asennuskomentorivi root@archiso ~ #
vastaavan tyylinen kuin ubuntun bash-terminaali ja archissa koko asennus hoidetaan nimenomaan terminaalin kautta
-ensimmäiseksi vaihdetaan näppäimistökartta suomalaiseksi, jotta näppäimet asettuvat oikeille paikoilleen. Tämä tapahtuu komennolla
lisäksi fontti tulee muuttaa niin, että se tukee kunnolla ääkkösiä ja erikoismerkkejä, tapahtuu komennolla
mikäli välttämättä haluat muuttaa asennuskieleksi suomen (itse pidän englanninkielenä, jotta ongelmanratkonta netissä helpottuisi) onnistuu se seuraavalla komennolla
nyt sinulla on nano-tekstieditorilla avattuna tiedosto locale.gen, etsi sieltä kohta #fi_FI.UTF-8 UTF-8
poista edessä oleva #-merkki, paina ctrl-X ja paina y, jotta muutos tallentuu.
-seuraavaksi tarkistamme internet-yhteyden (välttämätön, mikäli käytetään netin kautta paketit hakevaa asennuslevyä) kirjoita
mikäli seuraavaksi lukee: 3 packets transmitted, 3 received, 0% packet loss, time ?ms, internetyhteys on valmiiksi kunnossa
muutoin joudutaan asettamaan nettiyhteys kuntoon

langallinen yhteys
tarkista aluksi käytätkö langallista yhteyttä (virtualboxissa yhteys on aina langallinen riipumatta siitä, miten koneesi oikeasti on yhteydessä internettiin) katso koneestasi onko siihen kiinnitettynä ethernet-johto
Mikäli on ja yhteys ei siitäkään huolimatta toimi, kertoo se siitä, että dhcpcd on pois päältä tai ei ole tunnistanut dynaamista ethernet-yhteyttäsi. Korjaamme tilanteen luomalla staattisen ethernet-yhteyden
selvitetään yhteyden nimi kirjoittamalla
nyt terminaalissa näkyy
1: lo
2: enp0s3 (tai vastaavaa)
3-n: kaikki loput yhteydet
lo tarkoittaa localia, eli verkkokortin omaa silmukointia. Tämä ei siis ole haluamamme yhteys,

enp0s3 vaikuttaa lupaavalta ja varmistaaksemme että se todella on langallinen, kirjoitetaan
nyt pitäisi näkyä: lo no wireless network ja enp0s3 no wireless network, jolloin enp0s3 on siis todella langallinen yhteys. Muussa tapauksessa katso, mikä muu yhteys on ”no wireless network” ja kirjoita sen nimi ylös
voit tässä kohtaa yrittää vielä käynnistää dynaamista ethernet-yhteyttä kirjoittamalla
esimerkiksi dhcpcd enp0s3
testaa seuraavaksi yhteyden toimivuus pingaamalla, kuten yllä tehtiin aikaisemmin. Mikäli yhteys ei edelleenkään toimi, jatkamme staattisen ethernet-yhteyden yhdistämistä
tarvitset tiedot seuraavista asioista (katso toisen saman koneen käyttöjärjestelmän asetuksista jos et muuten tiedä)
. staattinen IP-osoite (static IP address)
. verkkomaskin peite (Subnet mask)
. oletusyhdyskäytävän osoite (Gateway’s IP address)
. nimipalvelun osoite/osoitteet (DNS IP adresses)
. Domain name (paikallisessa LAN-verkossa voit keksiä itse)
aktivoidaan yhteys kirjoittamalla
(esimerkiksi ip link set eth0 up)
lisätään IP-osoite komennolla
(esimerkiksi ip addr add 192.168.1.0/255.255.255.0 dev eth0)
lisätään oletusyhdyskäytävä
(esimerkiksi ip route add default via 192.168.1.1)
lisätään nimipalvelun osoitteet ja domain name muokkaamalla resolv.conf-tiedostoa, kirjoita
kirjoita esimerkiksi:
nameserver 61.23.173.5
nameserver 61.95.849.8
search example.com
(example.com kohtaan tulee domain name)

langaton verkko
ensiksi tunnistetaan verkkokortti kirjoittamalla
tai jos käytät USB-verkkokorttia
varmistetaan, että langattoman verkon ajuri on haettuna kirjoittamalla
nyt etsi kohta jossa ei lue ”no wireless extensions”, esimerkiksi wlp3s0
avataan verkkoyhteys tätä kautta
(esimerkiksi ip link set wlp3s0 up)
mikäli terminaali tulosti seuraavan rivin: SIOCSIFFLAGS: No such file or directory, tarkoittaa se, että langaton verkkokortti vaatii firmwaren asentamista, muutoin yhteys on kunnossa. Voit tarkistaa firmware-tarpeen kirjoittamalla
jolloin tulostuu esimerkiksi: firmware: requesting iwlwifi-5000-1.ucode
tässä tapauksessa live-ajo huolehtii, että oikea firmware on esiasennettuna /usr/lib/firmware, mutta se pitää käsin asentaa varsinaiseen järjestelmään ennen rebootia
lopuksi yhdistetään langaton verkko nettiin komennolla
(esimerkiksi wifi-menu wlp3s0)
Osiointi
Varoitus! Aloittelijan kannattaa käyttää osiointiin Gparted-ohjelman graafista versiota live-cd:n tai koneella jo olevan OS:n kautta, muutoin käytämme cfdisk-ohjelmaa suoraan tässä terminaalissa
HUOM! tässä kohtaa on syytä ottaa huomioon koneenkäytön tarpeet, kuten haluatko ajaa windowsia, eri linux-distroa tai jotain täysin muuta OS:ää
Tässä kohdassa keskitymme tekemään dualbootattavan koneen, jossa oletamme windowsin olevan jo asennettuna, näinollen käytämme MBR-osiointitaulua.
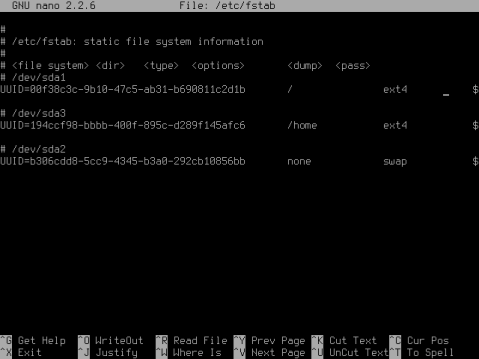
osiot:
sda1 – tältä osiolta löytyy oletusarvoisesti windows. Sen kooksi riittää minimissään 30GB, mutta säädä määrä niin, että tarvitsemasi pelit tulevat mahtumaan osiolle
sda2 – tälle osiolle asennetaan boot loader eli tässä tapauksessa GRUB2
sda3 – tälle osiolle tulee itse Arch linux ja kaikki käyttäjän omat tiedostot /home-kansioon
sda4 – niinkutsuttu swap-osio, eli osio jota linux käyttää kun välimuisti täyttyy nopeammin kuin tyhjenee. Swap-osion koko jakaa mielipiteitä (jopa swapin käyttö jakaa mielipiteitä). Yleensä itse laitan kooksi Ram-muistien koon – 2xram muistien koon
/home-kansiolle voi tässä kohtaa haluttaessa luoda myös oman osionsa, jolloin järjestys voisi olla seuraava:
sda1 – windows-osio
sda2 – bootloader-osio
sda3 – Arch Linux asennus
sda4 – osio /home-kansiolle
sda5 – Swap-osio
MIKÄLI OLET JO OSIOINUT KIINTOLEVYN, SIIRRY SUORAAN KOHTAAN OSIOIDEN MOUNTTAAMINEN
kirjoitetaan
nyt avautui uuteen näkymään cfdisk, jossa näemme windows-osion kohdassa sda1 mikäli se on jo aiemmin asennettu,

luodaan uusi osio valitsemalla ”new” -> ”primary” -> size 100.0 -> ”beginning” -> ”Bootable”
nyt meillä on /boot-osio kohdassa sda2, mikäli haluat vaihtaa tiedostotyyppiä osiolle, valitse ”Type” -> listalta tyypin numero ja kirjoita se kenttään
paina alaspäin-nuolta siirtyäksesi tyhjän tilan kohdalle, valitse ”new” -> ”primary” -> size (lopputila miinus swap-osion määrä) -> ”beginning”
lopuksi luodaan swap-osio, eli taas painat alaspäin-nuolta -> ”new” -> ”logical” -> size (tässä kohdassa ei tarvitse muuttaa kokoa vaan käytetään lopputila hyväksi) -> ”Type” -> kirjoita 82 (linux swap/solaris)
Nyt osiot on luotu. Tarkista tässä kohtaa, että olet tyytyväinen osioiden kokoon. Tämän jälkeen valitse ”write” ja kirjoita ”yes” sen jälkeen valitse ”quit”
Palattuasi terminaaliin, formatoi juuri luodut asemat komennolla
(jossa x on juuri luomamme osio, formatoi siis vain ne osiot äläkä esimerkiksi windows-osiota, joka löytyy oletuksena kohdasta sda1, älä käytä tätä komentoa swap-osioon!)
swap-osio löytyy kohdasta sda5, joten otetaan se käyttöön komennolla
# swapon /dev/sda5
Osioiden mounttaaminen
jotta voimme olla täysin varmoja, mille osioille tulee mikäkin mount point, kirjoita
.

HUOM! VAIN YKSI OSIO PER MOUNT HAKEMISTO
aloitetaan määritellään root- eli juurihakemiston sijainti (kansio johon varsinainen Arch Linuxin
asennus tulee), kirjoita
(esimerkiksi mount /dev/sda3 /mnt)
Seuraavaksi määrittelemällä boot loader-hakemisto, kirjoita
# mount /dev/sdax /mnt/boot
(esimerkiksi mount /dev/sda2 /mnt/boot)
seuraavaksi määrittelemme kotihakemiston sijainnin, kirjoita
# mount /dev/sda4 /mnt/home (käytä tässä osiota, johon tulee käyttäjän omat tiedostot ja ohjelmat, tässä tapauksessa sda4)
nyt sekä root että home-polku on mountattu oikeille osioille
swap-osiolle ei määritetä mountpointia vaan se määriteltiin tässä ohjeessa aiemmin komennolla swapon
Latauspalvelu:
Jotta paketinhallinta saa tarvittavat paketit haettua netistä, tulee meidän varmistua, että peilipalvelun eli mirrorin osoite on oikein, kirjoita
käyttääksemme suomen mirror-palvelua ensisijaisena, siirry kursorilla kohtaan ## Score: 2.6, Finland ja vie kursori alemman rivin kohdalle, jossa lukee tyyliin Server = http://mirror.academica.fi/archlinux/$repo/os/$arch
paina alt+6 kopioidaksesi rivin
mene pageup-napilla ylös ensimmäisen mirror-serverin kohdalle (varmista, että kursori on rivin yläpuolella)
paina ctrl+u liittääksesi rivin paikalleen
paina ctrl+x poistuaksesi nanosta (paina y tallentaaksesi muutokset)

Base systemin asennus
base rakentaa minimaalisen käyttöjärjestelmäasennuksen, jolloin luodaan pohja Arch linux -asennukselle, kirjoita terminaaliin
paina enter kun järjestelmä ilmoittaa paketit baseen ja base-develiin
kun järjestelmä kysyy proceed with installation? Paina y ja paina enter
mikäli terminaaliin tulee ilmoitus: error: failed to commit transaction (invalid or corrupted package), kirjoita
mikäli asennus toistuvasti valittaa, ettei ladattuja paketteja voi kirjoittaa levylle (failed writing body (52 != 1348)) kertoo tämä siitä, että osio on liian pieni ja sitä tulee suurentaa (suositus >2GB)
fstab-tiedoston luonti
fstab sisältää tiedot luoduista levyosioista ja mount pointeista. Näin ollen sen olemassaolo on koneen toiminnan kannalta erityisen tärkeässä asemassa, luodaan fstab kirjoittamalla
seuraavaksi tarkistetaan fstab-tiedosto komennolla
tarkista osioiden nimet sekä kohdasta ”dir” että mount pointit on määritelty oikein (/boot, /home ja / ), lisäksi tarkista että root(/)-osiolla on viimeisenä arvona 1 eikä 0. Kaikissa muissa osioissa viimeinen arvo pitäisi olla joko 2 tai 0 (liikuta kuvassa näkyvissä riveissä kursoria yli $-merkin)
lisätietoa kentistä voi lukea täältä https://wiki.archlinux.org/index.php/Fstab#Field_definitions
Chroot
jotta pääsisimme muokkaamaan juuri asentamaamme arch linuxin asetuksia, tulee meidän suorittaa pääkäyttäjän siirto (chroot – change root), kirjoita
seuraavaksi konfiguroimme asentamiamme asetustiedostoja chrootin avulla:
Locale:
kirjoita
täältä etsit ne kielet, joita haluat Arch linuxin tukevan, kieli tulee käyttöön poistamalla #-merkki sen edestä, itse otin käyttöön en_US.UTF-8 UTF-8 ja fi_FI.UTF-8 UTF-8, poistu lopuksi nanosta painamalla ctrl+x ja tallenna muutokset painamalla y
kirjoita
jotta glibc päivittyisi valitsemillasi kielillä
kirjoita
tämä käsky luo tiedoston locale.conf ja määrittää sinne oletuskieleksi en_US.UTF-8, jos haluat mielummin suomenkielen käyttöösi, kirjoita
tämän jälkeen kirjoita
font & keymap
ladataksesi suomalaisen näppäimistökartan, kirjoita
vaihtaaksesi oletusfontin Lat2:n, kirjoita
kirjoita
ja kirjoita sinne
KEYMAP=fi
FONT=Lat2-Terminus16
jotta asetukset säilyisivät myös uudelleenkäynnistyksen jälkeen
Timezone
kirjoita
ja tarkista, että listalta löytyy Helsinki. Jotta saamme Helsingin aikavyöhykkeen käyttöön, tulee meidän luoda viittaus eli symlink tähän tiedostopolkuun
kirjoita
Kello
Tässä suositellaan käytettäväksi UTC:ta, jotta kellonaika päivittyisi mahdollisimman tarkasti. Toinen vaihtoehto on käyttää käyttäjän määrittelemää localtimea, mutta tällöin kahden eri käyttöjärjestelmän kanssa saattaa tulla ristiriitoja
kirjoita
Kernel moduulit
jos tiedät jonkin moduulin, jota tarvitset, voit lisätä sen tiedot tässä vaiheessa luomalla <moduulinnimi>.conf-tiedoston
kirjoita
kirjoita tiedostoon
#Load ’<moduulinnimi>’ at boot
<moduulinnimi>
HUOM! jos asennat Arch linuxia virtualboxille, lisää tässä kohdassa moduuli e1000 yllä olevien ohjeiden mukaisesti
hostname
koneen tunnistenimen (esimerkiksi käyttäjän nimi) kirjoittamalla
(esimerkiksi echo Arch > /etc/hostname)
verkkoyhteys
jos käytössäsi on dynaaminen lankayhteys, asenna seuraava paketti kirjoittamalla
seuraavaksi muokkaa netcfg-tiedostoa kirjoittamalla nano /etc/conf.d/netcfg ja muuta kohta WIRED_INTERFACE=”<yhteydennimi>”
HUOM! johtuen ISO-levyn asennuksessa johtuvasta bugista, yhteyden nimi käynnistyksen yhteydessä tulee olemaan eri kuin esimerkiksi eth0
saat yhteyden (=interface) nimen selville ajamalla seuraavan skriptin:
for i in /sys/class/net/*; do
echo ”==$i”
udevadm test-builtin net_id ”$i”;
echo
done 2>/dev/null

kirjoita ylläoleva teksti nanolla, tallenna nimellä interface.sh, anna käyttöoikeudet kirjoittamalla chmod a+x interface.sh ja kirjoita
yhteydennimi löytyy kohdasta PATHNAME=enp0s3
pacman-konfigurointi
kuten ubuntun apt ja fedoran yum, on myös Archilla oma paketinhallinta nimeltään pacman (heh!), muokataan paketinhallinnan asetuksia kirjoittamalla
tarkista, että seuraavat rivit ovat ilman #-merkkiä:
[core]
[extra]
[community]
jos käytät 64-bittistä käyttöjärjestelmää, kirjoita seuraavat rivit tiedoston loppuun
[multilib]
SigLevel = PackageRequired
Include = /etc/pacman.d/mirrolist
Root-salasana ja peruskäyttäjä
HUOM! ROOT-KÄYTTÄJÄÄ EI MISSÄÄN NIMESSÄ SAA KÄYTTÄÄ NORMAALISSA PÄIVITTÄISESSÄ KÄYTÖSSÄ, VAAN VAIN JA AINOASTAAN SILLOIN KUN TEHDÄÄN JÄRJESTELMÄN KANNALTA OLEELLISIA MUUTOKSIA, SILLOINKIN VAIN KYSEISTEN TOIMENPITEIDEN AJAN!
HUOM! kannattaa asentaa sudo komennolla pacman -S sudo . Tämän ansiosta voit avata väliaikaisen root-istunnon omalla käyttäjälläsi komennolla sudo, jolloin root-kirjautumisen tarve poistuu käytännössä kokonaan
määrittele järjestelmän root-salasana kirjoittamalla
passwd
tämän jälkeen luodaan käyttäjätili, jota käytetään automaattisesti oletuksena kirjoittamalla
(esimerkiksi useradd -m -g users -G wheel -s /bin/bash archie)
määritellään käyttäjälle salasana kirjoittamalla
passwd <käyttäjänimi> (esimerkiksi passwd archie)
nyt kun käyttäjä on luotu ja olet asentanut sudon, lisätään wheel-ryhmä listalle, joka saa käyttää sudoa, kirjoita
nyt eteesi aukeaa sudoers.tmp, etsi rivi User privilege specification, hieman sen alta pitäisi löytyä rivi #%wheel ALL=(ALL) ALL, poista sen edestä #-merkki, paina ctrl-x ja paina y, jotta muutos tallentuu
nyt kaikki wheel-ryhmään kuuluvat käyttäjät saavat oikeuden käyttää sudoa, mikäli tietävät oman käyttäjäsalasanansa

Bootloader-asennus ja konffaus
tässä raportissa käytämme Bios-pohjaista asennusta (MBR) GRUB-loaderille, joka on monipuolisempi kuin Syslinux, mutta hankalampi manuaalisesti kirjoittaa
asennetaan ensin grub-bios-paketti kirjoittamalla
sen jälkeen kirjoita
lopuksi kopioidaan grub-tiedosto boot-kansioon kirjoittamalla
tämän jälkeen voit luoda ja käyttää omaa grub.cfg-tiedostoa, mutta aloittelijoille suositellaan generoimaan automaattisesti tuo tiedosto. Asenna ensin os-prober kirjoittamalla
sen jälkeen kirjoita
mounttausten poisto ja uudelleenkäynnistys
kirjoita
kirjoita
kirjoita
ONNEKSI OLKOON! OLET ASENTANUT ARCH LINUXIN ONNISTUNEESTI!
seuraavaksi muutama toimenpide, jotta archin käytöstä tulisi miellyttävämpää (kuten graafisen työpöydän asennus)
(jos olet asentanut archin virtual boxille, valitse aloitusvalikosta boot existing OS)
kirjaudu sisään juuri luomallasi käyttäjällä
Ääni
Arch linuxin mukana tulee äänijärjestelmä ALSA, jonka työkalut kannattaa asentaa, kirjoita
X-ikkunointisysteemi
Nyt pääsemme vihdoinkin asentamaan graafista työpöytää Archillemme, mutta ensiksi tulee huolehtia graafisten ajureiden ja x-serverin asennuksesta. Voit myöhemmin tarvittaessa asentaa laitevalmistajan tarjoamat näytönohjainajurit, mutta näin aluksi asennamme repoista löytyvät open source -ajurit. kirjoita
seuraavaksi asennamme tuen 3D-grafiikalle, kirjoita:
HUOM! skippaa seuraava kohta, mikäli asennat archia virtual boxille:
näytönohjaimen ajurin asentaminen:
aluksi kirjoita
näin saat oletuksena ajurin jonka pitäisi toimia lähes kaikissa näyttösovittimissa, mutta ei juurikaan tue esimerkiksi 3d-grafiikkaa
seuraavaksi katso oman näytönohjainpiirisi kohdalta mikä ajuri sinun tulee asentaa:
Valmistaja: ajuri: jos 64-bit, asenna myös:
AMD/ATI xf86-video-ati lib32-ati-dri
Intel xf86-video-inte lib32-intel-dri
Nvidia xf86-video-nouveau lib32-nouveau-dri
Propiertary-ajurit (valmistajien toimittamat)
AMD/ATI catalyst-dkms lib32-catalyst-utils
NVidia nvidia lib32-nvidia-utils
nvidia-304xx lib32-nvidia-304xx-utils
HUOM!
mikäli sinulla on AMD/ATI-valmistajan näytönohjain, varmista myös onko malli
radeonin 2xxx, 3xxx tai 4xxx -sarjaa. Tällöin näytönohjain tarvitsee AMD:n legacy-ajurit, joiden asentamisesta voit lukea lisää täältä.
Muutoin asenna valitsemasi ajuri komennolla pacman -S <ajuri> (esimerkiksi pacman -S xf86-video-ati)
Sisääntuloajuri (touchpad/touchscreen)
mikäli käytät läppäriä tai tietokonetta, jossa on kosketushiiri/kosketusnäyttö, asenna seuraava paketti kirjoittamalla
Fontit
asenna truetype-fontit kirjoittamalla:
Työpöytäympäristö (desktop environment)
On oikeastaan käyttäjästä kiinni, millaisen työpöytäympäristön hän linuxilleen haluaa, sillä yleisimmät on saatavilla lähes kaikille distroille. Listan Archille saatavilla olevista työpöydistä löydät täältä https://wiki.archlinux.org/index.php/Desktop_Environment
kun olet tehnyt valinnan, minkä työpöydän haluaisit, yksinkertaisesti kirjoitat
(esimerkiksi pacman -S xfce4)
tämän jälkeen kaikki tarvittavat paketit asentuvat koneellesi
Mikäli haluat (todennäköisesti haluat jos olet uusi Arch-käyttäjä) archin käynnistyessä päätyä Display manageriin, eli login-screeniin, se kannattaa ottaa käyttöön tässä vaiheessa. Myös Display managereja on erilaisia ja ne löydät helpoiten täältä https://wiki.archlinux.org/index.php/Display_Manager
Hieman haastavampi, mutta samalla palkitsevampi työpöytäympäristö on nimeltään Xmonad. Siinä käyttäjä pääsee käytännössä itse määrittämään haluamansa ikkunointiasetukset suoraan tekstitiedostoon, josta X-server ajetaan. Koska XMonadin asennus poikkeaa merkittävästi muista työpöytäympäristöistä, valitsen sen tähän esimerkkityöpöydäksi, ehkäpä joku innostuu sitä esimerkin avulla käyttämään ja kokeilemaan.
aluksi kun olet käynnistänyt archin ja kirjautunut normaalikäyttäjänä sisään, komenna
seuraavaksi luomme .xinitrc-tiedoston komennolla
lisätään sinne rivit
xsetroot -cursor_name left_ptr
# Finnish keyboard layout
setxkbmap -layout fi
# start xmonad
exec xmonad
tallenna painamalla ctrl+x, paina y, jotta tiedosto tallentuu.
Seuraavaksi komenna
nyt x-server osaa liittää hiiren työpöytään, vaihtaa näppäimistökieleksi suomen sekä tietysti käynnistämään XMonadin komennosta
ennen ensikäynnistystä tehdään vielä muutama juttu: komenna
seuraavaksi luomme ensimmäisen xmonad-konffitiedostosi! Komenna
kirjoita seuraavat rivit:
import XMonad
main = do
xmonad $ defaultConfig
paina ctrl+x, tallenna painamalla y. Lopuksi vielä komenna
xmonad –recompile
Nyt perusasetus-XMonad on valmis käynnistettäväksi!
käynnistä XMonad komentamalla
…
Näkyy pelkkä tyhjä musta ruutu? Ajattelet jonkin kohdan epäonnistuneen?
Ei hätää, mitään virhettä ei ole tapahtunut, vaan xmonad toimii kuten pitääkin. Koska emme ole konfiguroineet käytännössä mitään xmonad.hs-tiedostoon,
näkyy ruudulla pelkkä raakile, jota voi lähteä muokkaamaan mielin määrin. Painamalla
vasen alt + shift + enter
avautuu terminaali-ikkuna, jota voi käyttää normaalisti. Mikäli haluat sammuttaa xmonadin, paina
vasen alt + shift + q
Miten sitten xmonad.hs:ää konfiguroidaan, yksinkertaisesti avaamalla tiedosto nanolla, tallentamalla muutokset ja ajamalla
xmonad –recompile
itse konfiguroinnista löydät lisätietoa blogista http://www.linuxandlife.com/2011/11/how-to-configure-xmonad-arch-linux.html
blogissa esitelty konfigurointi löytyy täältä http://www.linuxandlife.com/p/my-xmonadhs.html
pari videota xmonadista http://xmonad.org/videos.html
Ip-Tables -tulimuuri
Sain Työasemat ja Tietoverkot -kurssilta tehtäväksi keksiä oman tehtävän kurssiin liittyvistä aiheista.
Keksimäni tehtävä kuuluu seuraavasti:
“Aseta IpTables-tulimuurin asetukset kuntoon, kerro millä komennoilla muokkaat yksittäisiä portteja esimerkiksi auki ja kiinni.”
Käytössäni on xubuntu linux 12.04 -käyttöjärjestelmä, jossa IpTables-tulimuuri on valmiiksi asennettu. Aion siis muokata jo olemassaolevaa asennusta.
Aloitetaan
23.9.2012
23:31 Firewall-scripti
Sivulta http://myy.helia.fi/~karte/iptables_firewall.html löytyy valmis shellscript, jota ajamalla saa tarvittavat porttiasetukset hoidettua. Huomaa että xubuntussa komennot ovat hieman erilaiset.
Ensin loin tiedoston nimeltä firewall komennolla
$ nano firewall
seuraavaksi siirsin copy-pastea käyttäen sivulta löytyvän scriptiohjelman tekstitiedostoon ja tallensin.
23:38 tiedoston kopiointi ja käyttö
kopioin tiedoston /usr/local/bin -kansioon komennolla
$ sudo cp firewall /usr/local/bin/
varmistin, että käyttöoikeudet on kunnossa komennolla
$ sudo chmod u+x /usr/local/bin/firewall
nyt pystyin ajamaan tiedoston käyttämällä komentoa
$ sudo firewall
23:44 tarkistus
komennolla
$ sudo iptables -L
voi tarkistaa tulimuurin läpäisyn: INPUT-osion alla olevat säännöt tarkoittavat internetistä tulevia pyyntöjä, FORWARD-osion alta löytyy määritelmät pyynnön edelleenohjaamiseen toiseen porttiin ja OUTPUT-osion alta löytyy omalta koneelta lähtevien pyyntöjen käsittely.
Jos siis halutaan avata portti ulkoatulevalle liikenteelle, tulee se määrittää INPUT-osion alle. Esimerkiksi portti 22, jota käytetään SSH-liikenteen ohjaamiselle, voidaan ottaa käyttöön komennolla
$ iptables -A INPUT -i eth0 -p tcp –dport 22 -j ACCEPT
jossa INPUT tarkoittaa sisääntulevaa liikennettä, eth0 verkkoyhteyttä (langattomalla verkolla wlan0) ja ACCEPT hyväksyy liikenteen
lisätietoa sisään- ja ulostulevan porttiliikenteen ohjauksesta löytyy englanniksi osoitteesta http://www.thegeekstuff.com/2011/03/iptables-inbound-and-outbound-rules/
Lähde:
http://www.thegeekstuff.com/2011/03/iptables-inbound-and-outbound-rules/
http://myy.helia.fi/~karte/iptables_firewall.html
GNU Free Documentation License
Version 1.3, 3 November 2008
Copyright © 2000, 2001, 2002, 2007, 2008 Free Software Foundation, Inc. <http://fsf.org/>
Everyone is permitted to copy and distribute verbatim copies of this license document, but changing it is not allowed.
Vanhan Linux-kokeen kokeilu
Työasemat ja Tietoverkot -kurssin Linux-kokeeseen valmistautuen päätin harjoituksen vuoksi tehdä vanhan kurssikokeen kotona ja laatia raportin muistamisen tueksi.
Tehtävänanto kuuluu seuraavasti:
“Karttakatu Oy
Me Karttakatu Oy:ssä teemme karttoihin liittyviä weppisovelluksia. Olemme muutaman hengen yritys.
Asenna työasema, jolla tavallisimmat toimistotyöt onnistuvat (weppisurffailu, tekstinkäsittely). (Asentuessa voit käydä kommentoimassa kavereiden blogeja).
Työntekijämme ovat Einari Vähäkäähkä, Pekka Winha, Åke Andersson ja Leila Laila. He haluavat kehittää PHP-kotisivuja etäkäyttöyhteydellä. Asenna tarvittavat palvelut ja tee esimerkkisivut.
Asenna kaikkien käyttäjien käyttöön skripti (shell script) nimeltä “mystatus”, joka näyttää vapaan levytilan (df -h) ja koneen ip-osoitteen.
Tähtäätkö huipputulokseen? Pekka Winha haluaa käyttää MySQL tietokantaa. Asenna hänelle MySQL-tietokanta ja siihen PhpMyAdmin-weppiliittymä.”
Aion asentaa työasemaksi Xubuntu Linux 12.04 -käyttöjärjestelmän, jossa on webbisurffailua varten Firefox -selain. Kotisivujen luontia varten asennan käyttäjille Apache2-demonin ja siihen luon valmiiksi esimerkkisivut käyttäjille erikseen.
Aloitetaan
23.9.2012
18:06 Alustus
Käynnistin koneelleni Xubuntu Linux 12.04 -live-cd:n johon teen tarvittavat muokkaukset. Normaalisti asentaisin järjestelmän kokonaan koneelle, mutta tämä on harjoitustyö.
Valitsin kieleksi englanti (kielen voi tarvittaessa määrittää erikseen kaikille käyttäjille)
Vaihdoin näppäimistön oletuskielen suomeksi komennolla
$ setxkbmap fi
18:07 mystatus-script
ennen käyttäjän luomista kirjoitin tehtävänannossa pyydetyn mystatus-shellscriptin ja lisäsin sen kansioon /etc/skel/
Tämä sen takia, että tiedosto kopioituu silloin automaattisesti uudelle käyttäjälle aina, kun uusi käyttäjä luodaan. Tämä nopeuttaa ylläpitäjän toimia huomattavasti.
Menen siis ensiksi omaan /home/xubuntu/ -kansiooni ja suoritan seuraavan komennon
$ nano mystatus
sen jälkeen kirjoitin tekstieditoriin seuraavan koodin:
#!/bin/bash
df -h
ifconfig
Seuraavaksi tallensin tiedoston, tein siitä kopion kohteeseen /usr/local/bin/ komennolla
$ sudo cp mystatus /usr/local/bin/
ja asetin kaikille käyttäjille oikeudet komennolla
$ sudo chmod a+x mystatus
nyt pystyn ajamaan scriptin kirjoittamalla $ mystatus
kopioin seuraavaksi script-tiedoston kansioon /etc/skel
$ sudo cp mystatus /etc/skel/
näin tiedosto kopioituu myös kaikkien uusien käyttäjien kotihakemistoon
18:40 käyttäjät
loin käyttäjät koneelle komennoilla
$ sudo adduser einari
$ sudo adduser pekka
$ sudo adduser åke
$ sudo adduser leila
laitoin salasanaksi heidän etunimensä, mikä on huono salasana, mutta testivaiheessa ei välttämätön. Todellisessa työtehtävässä tekisin jonkinlaisen salasanamuodostusohjeen tekstitiedostoon ja lisäisin sen /etc/skel/ -hakemistoon. Näin käyttäjät pääsisivät itse tarkistamaan ja vaihtamaan salasanansa omanlaisikseen.
Jouduin tekemään poikkeuksen Åken tunnuksessa, sillä ääkkösiä ei suvaita tunnuksen nimessä. Kirjoitin vastaavasti käyttäjänimeksi ake ja kokonimeksi Åke Andersson, näin ei tule sekaannuksia
19:00 Toimistotyökalut
Asensin libreofficen komennoilla
$ sudo apt-get update
$ sudo apt-get install libreoffice
19:10 – 19:12 Kotisivujen luontimahdollisuus
asensin Apache2 jotta käyttäjät pääsevät tekemään ja jakamaan omia kotisivujaan.
$ sudo apt-get install apache2
testasin että localhost toimii avaamalla firefoxin, samalla tuli myös firefoxin toiminta todettua
Tulostui seuraava teksti
It works!
This is the default web page for this server.
The web server software is running but no content has been added, yet.
Näinollen Apache2 asentui oikein ja toimii, samoin firefox toimii ilman ongelmia.
19:59 index.html
Seuraavaksi halusin luoda testisivut jokaiselle käyttäjälle, joten ensiksi muokkasin Apachen moduulia hakemaan nettisivun /home/user-kansiosta
$ sudo a2enmod userdir
$ sudo service apache2 restart
nyt loin jokaiselle käyttäjälle public_html -kansion, jonne teen oletus- eli index.html-tiedostot
$ for S in ake einari leila pekka ; do sudo mkdir /home/$S/public_html/; done
seuraavaksi loin index.html:t komennolla
$ nano index.html
ja kopioin tiedostot kaikille käyttäjille komennolla
$ sudo cp index.html /home/[user]/public_html/
jossa [user] on käyttäjän nimi
varmistetaan vielä että jokaisella käyttäjällä on oikeus kirjoittaa index.html-tiedostoaan, muuten he eivät pysty muokkaamaan sivustoaan lainkaan
$ for S in pekka leila ake einari ; do sudo chmod a+rwx /home/$S/public_html/index.html; done
nyt pitäisi sivut toimia, avasin nettiselaimen ja tarkistin osoitteesta localhost/~[user]/ jossa [user] on käyttäjätunnus, toimiiko index.html-tiedostot kaikilla käyttäjillä.
Ei toiminut joten seuraavaksi kokeilin uudestaan muokata apachen moduulia:
$ sudo a2enmod userdir
$ sudo service apache2 restart
nyt jokaisella käyttäjänimellä tulostui Hello World!, eli kotisivut toimivat.
20:30 PHP
Seuraavaksi asensin tehtävänannon mukaisesti kaikille käyttäjille PHP-käyttömahdollisuuden, joten ensiksi asensin apache2 kuuluvan PHP5-kirjaston:
$ sudo apt-get install libapache2-mod-php5
tämän jälkeen annoin komennon
$ sudoedit /etc/apache2/mods-enabled/php5.conf
ja ”uloskommentoin” eli lisäsin rivien 11-15 eteen merkin #
kyseinen silmukka estää PHP-tiedostojen käytön käyttäjän kotihakemistosta, joten toimintamme kannalta se on turha.
Tämän jälkeen kaikki index.html -tiedostot tulee muuttaa muotoon index.php. Tämä kävi helpoiten komennolla
$ for S in leila pekka einari ake ; do sudo mv /home/$S/public_html/index.html /home/$S/public_html/index.php; done
ja varmistetaan käyttöoikeudet:
$ for S in leila pekka einari ake ; do sudo chmod a+rwx /home/$S/public_html/index.php; done
nyt tiedostoilla voi tehdä PHP-koodausta ja se näkyy samalla tavalla nettiselaimella kuin aiemmin testattuamme html-tiedostot.
21:00 etäkäyttömahdollisuus
seuraavaksi piti jokaiselle käyttäjälle järjestää mahdollisuus etäkäyttää omaa käyttäjätunnustaan, joten asensin openSSH-palvelimen
$ sudo apt-get install openssh-server
seuraavaksi kokeilin yhdistää kaikkiin käyttäjätunnuksiin xubuntu-käyttäjätunnuksilla:
ensin selvitin koneeni ip-osoitteen
$ ip addr
tämän jälkeen muodostin yhteyden suoraan ssh:lla komennolla
$ ssh [user]@192.168.1.67
yhteys muodostui jokaisen käyttäjän kohdalla, näin ollen lähiverkossa yhteydenmuodostus onnistuu. Mikäli kotona haluaa kokeilla openSSH:n käyttöä, tulee oman reitittimen palomuuriin tehdä portille 22 aukko ulkoisille pyynnöille, jotta esimerkiksi kännykällä voi ottaa ssh-yhteyden koneeseen. Tämä asetus kuitenkin riippuu eri reitittimien hallintaliittymän asetuksista, jotka käytännössä ovat kaikissa erilaisia. Siksi en paneudu aiheeseen vielä tämän tarkemmin.
21:15 mySQL
Seuraavaksi asennan Pekka Winhalle mySQL-tietokannan asentamalla paketin
$ sudo apt-get install mysql-server
määritän salasanat ja tämän jälkeen lisään terokarvinen.com -sivulta poimimani php-sivun, jolla päästään käsiksi mySQL:n
$ ssh pekka@192.168.1.67
$ cd public_html/
$ nano database.php
tiedostoon lisäämäni koodi löytyy osoitteesta http://myy.helia.fi/~karte/fedora_linux_apache_mysql_php.html
kohdasta ”PHP database example
”
tämän jälkeen tallensin ja kirjoitin
$ exit
nyt mySQL-tietokantaan pääsee käsiksi osoitteesta http://192.168.1.67/~pekka/database.php ja Pekka voi sitä omalla käyttäjätunnuksellaan muokata
21:45 Lyhyesti
Kertauksena asensin käyttöjärjestelmän (live-cd tässä tapauksessa), loin neljä käyttäjää (adduser-komento), kaikille käyttäjille PHP-nettisivujen luomismahdollisuus (Apache2, PHP5-kirjasto ja index.php-tiedostot käyttäjäkansioihin), mahdollisuuden kirjautua etänä (openSSH-demoni, mahdolliset aukkojen tekemiset palomuuriin) ja Pekalle erikseen pääsyn mySQL-tietokantaan (mySQL-server, PHP-ajettava database-tiedosto käyttäjäkansioon)
Lähteet:
http://myy.helia.fi/~karte/fedora_linux_apache_mysql_php.html
http://terokarvinen.com/2012/linux-koe-tyoasemat-ja-tietoverkot-25
https://kristerholmstrom.wordpress.com/
GNU Free Documentation License
Version 1.3, 3 November 2008
Copyright © 2000, 2001, 2002, 2007, 2008 Free Software Foundation, Inc. <http://fsf.org/>
Everyone is permitted to copy and distribute verbatim copies of this license document, but changing it is not allowed.
Komennon ajaminen usealle käyttäjälle SSH-yhteydellä
Sain tehtäväksi muodostaa joko useaan koneeseen yhteyden ssh:lla tai useaan yhden koneen käyttäjään sekä suorittaa komentoja yhtäaikaisesti kaikille yhteyksille. Useiden koneiden alustamisen ja hallinnan kannalta tämä on oleellinen taito, joka säästää aikaa ja vaivaa sekä mahdollistaa konfiguroinnin etänä, jolloin esimerkiksi kaveria voi auttaa tai siirtää tiedostoja suoraan ssh-yhteyden päästä.
Päätin luoda virtuaalisen koneen virtualbox-ohjelmalla, johon luon useita käyttäjiä fyysisen koneeni kautta. Molempiin asensin xubuntu linux 12.04 -käyttöjärjestelmän.
02:35 Virtualbox
Aloitin asentamalla virtualboxin, jotta saan kokeiltua etäyhteyttä toiseen “koneeseen” . Latasin koneelleni virtualbox-4.2 i386-version .deb-paketin, jonka asensin suoraan käyttäen Ubuntu software centerin pakkauksenhallintaa.
02:44 uusi virtuaalikone
käynnistin virtualboxin ja luon uuden koneen new-nappia klikkaamalla, nimeksi annoin “xubuntu”, käyttöjärjestelmän tyypiksi ubuntu linux.
Oletuksena virtualbox ehdottaa 512Mb varaamista välimuistista virtuaalikoneen käyttöön. Periaatteessa vähempikin riittää, mutta luultavasti tulen virtuaalikonetta jatkossakin käyttämään, joten pidän oletusasetuksen eli 512Mb.
Loin uuden virtuaalisen kiintolevyn koneelle, jonka tilanmääräksi asetin 4,35Gb ja tyypiksi Virtual Image disk. Nyt minulla on valmis virtuaalikone.
02:51 Virtuaalikoneen käyttöjärjestelmä
seuraavaksi aloin asentamaan virtuaalikoneelle käyttöjärjestelmää. Käytin aiemmin luomaani xubuntu linux 12.04 -live-cd:tä, jonka luonnin tein artikkelissa: https://kristerholmstrom.wordpress.com/2012/08/21/xubuntu-linux-12-04-asentaminen/
käynnistin virtuaalikoneen, jolloin ohjattu käyttöjärjestelmäasennus kysyy lähdettä, jossa käyttöjärjestelmäasennus löytyy, valitsen DVD-asemani ja laitoin live-CD:n sisään. Seuraavaksi asensin käyttöjärjestelmän kuten tavalliseenkin koneeseen.
04:00 Demoni
asensin openSSH-demonin virtuaalikoneelle, jotta saan muodostettua yhteyden omalta koneeltani.
04:03 IP-osoite
tarkistin koneen IP-osoitteen komennolla
$ ip addr
koska asetin virtuaalisen verkkokortin NAT-tilaan, ip-osoite oli muotoa 10.0.2.15.
OpenSSH-demoni oli asennettu ja IP-osoite tiedossa, joten seuraavaksi siirryin fyysisen koneeni puolelle muodostamaan yhteyttä.
04:10 yhdistäminen
avasin terminaalin ja kirjoitin komennon
$ ssh krister@10.0.2.15
jossa “krister” on käyttäjänimi virtuaalikoneella, johon haluan kirjautua.
Yritys epäonnistui, en onnistunut yhdistämään virtual boxille. Sain vain virheilmoituksen aikakatkaisusta
“ssh: connect to host 10.0.2.15 port 22: Connection timed out”
sensijaan kokeilin yhdistää virtuaalikoneelta fyysiselle koneelleni ja se onnistui. Ilmeisesti virtualbox suojaa portteja myös lähiverkosta tulevilta pyynnöiltä oletuksena.
Päätin tehdä tehtävän loppuun syöttäen komennot virtuaalikoneelta ja ohjailemalla fyysistä konettani.
04:20 julkinen avain
helpotin kirjautumistani luomalla julkisen avaimen varmennuksen, jolla virtuaalikone tunnistautuu fyysiselle koneelleni. Käytin komentoa
$ ssh-keygen
seuraavaksi siirsin julkisen avaimen ssh-yhteydellä fyysiselle koneelleni
$ ssh-copy-id krister@192.168.1.67
ohjelma ilmoitti että suoritti siirron onnistuneesti ja pyysi vielä muodostamaan ssh-yhteyden koneeseen, jotta voin varmistua avaimen toimivuudesta. Muodostin ssh-yhteyden ja salasanakyselyä ei tullut lainkaan, näinollen julkinen avainsalaus toimi.
04:30 uudet käyttäjät
seuraavaksi luon kaksi uutta käyttäjää koneelleni, kun olen kirjautuneena fyysiselle koneelleni
$ sudo adduser vieras
$ sudo adduser mikko
nyt minulla on kolme käyttäjää fyysisellä koneellani: krister, mikko ja vieras.
04:35 julkiset avaimet ja komennon etäajo
lisään julkiset avaimet myös näihin uusiin käyttäjätileihin. Katkaisen ensin ssh-yhteyden ja kirjoitan komennot
$ ssh-copy-id mikko@192.168.1.67
$ ssh-copy-id vieras@192.168.1.67
testasin vielä molemmat salaukset ja ne toimivat.
Nyt pystyin suorittamaan komentoja etänä kaikille käyttäjille yhteisesti
esimerkiksi haluan ajaa komennon “w” kaikilla käyttäjillä, kirjoitan:
$ for S in krister mikko vieras ; do ssh $S@192.168.1.67 w; done
komento toimi ja kaikista kolmesta käyttäjätunnuksesta tuli ssh:n välityksellä vastaukset.
Lähde:
http://myy.helia.fi/~karte/control_many_computers_with_ssh.html
GNU Free Documentation License
Version 1.3, 3 November 2008
Copyright © 2000, 2001, 2002, 2007, 2008 Free Software Foundation, Inc. <http://fsf.org/>
Everyone is permitted to copy and distribute verbatim copies of this license document, but changing it is not allowed.
Ohjelmointikielten testaaminen Hello World -ohjelmalla
Sain kotitehtäväksi Työasemat ja Tietoverkot-kurssilta testata kolmea eri ohjelmointikieltä ja tulkkien toimivuutta.
Päätin tehdä testit seuraavilla ohjelmointikielillä: Java, Python ja C++.
Tein myös javalla edistyneemmän ohjelman, jonka lähdekoodin löytää osoitteesta
ohjelman voi ajaa maalaamalla koodin hiirellä, kopioimalla leikepöydälle ( ctrl + c) ja luomalla tekstieditorilla LotteryNumberGenerator.java -nimisen tiedoston, johon koodi liitetään (ctrl + v).
Vaiheittaiset ohjeet java-tiedoston ajamiseen löytyy tästä raportista.
HUOM! LotteryNumberGenerator-ohjelma on ilmaisjaossa GNL-lisenssin mukaisesti. Tarkemmat tiedot lisenssistä raportin lopussa.
JAVA
18.9.2012
22:57 Tulkin asentaminen
asensin viimeisimmän java development kitin, eli lyhennettynä “jdk”, jotta pystyisin ajamaan java-tiedostoja suoraan komentorivitulkin kautta. Ensiksi päivitin pakkauslistan komennolla
$ apt-get update
seuraavaksi asensin jdk versio 6:n, koska sen pitäisi olla helposti yhteensopiva komentorivitulkilta ajettaessa. Jdk:ta on saatavilla myös uudempi versio 7, mutta en käyttänyt sitä testissä lainkaan.
Asensin käyttäen komentoa
$ sudo apt-get install openjdk-6-jdk
nyt koneellani pystyy luomaan java-tiedostoja ja ajamaan niitä tulkin avustuksella
23:04 Hello World -tiedosto
loin testaamista varten HelloWorld.java -tiedoston, joka tulostaa tekstin “Hello World!”.
Ensiksi siirryin kansioon, johon halusin luoda tiedoston
$ cd /home/krister/codes/
kansion “codes” olin aiemmin luonut mkdir-komennolla. Suosittelen käyttämään erillistä kansiota omille kooditiedostoille ja mielellään tekemään myös omat kansiot jokaiselle käyttämälle kielelle erikseen. Näin tiedostot on jälkikäteen helpompi löytää ajamista ja muokkaamista varten.
Tiedosto luodaan esimerkiksi komennolla
$ nano HelloWorld.java
seuraavaksi kirjoitin koodin ja tallensin ctrl + X painamalla. Kirjoittamani HelloWorld-koodin löytää osoitteesta
23:21 Ohjelma ajettavaan muotoon
seuraavaksi loin tiedostosta .class-tiedoston, jotta tulkki pystyy tunnistamaan kooditiedostoni. Käytin komentoa
$ javac HelloWorld.java
lopuksi ajoin valmiin ohjelman komennolla
$ java HelloWorld.java
jolloin komentoriville tulostui teksti “Hello World!”. Ohjelma ja tulkki toimivat näinollen kuten pitääkin.
PYTHON
18.9.2012
Python-ohjelmien ajaminen komentorivitulkissa on todella helppoa ja yksinkertaista, sillä python-tulkki löytyy oletuksena linux-asennuksesta. Loin tässäkin HelloWorld-ohjelman, joka tulostaa Hello World! -tekstin
23:24 tiedoston luominen & testaaminen
koska tulkki on valmiiksi asennettu, pääsin suoraan tekemään ajettavan ohjelmatiedoston komennolla
$ nano HelloWorld.py
tällä kertaa riitti, että kirjoitin tiedostoon aluksi #!/usr/bin/python, eli polun, jota kautta tiedetään millä ohjelmalla tiedosto tulee ajaa. Seuraavaksi tein pari rivinvaihtoa enterillä ja kirjoitin
print “Hello World!”
tallensin tiedoston ja ajoin ohjelman komennolla
$ python HelloWorld.py
jolloin ohjelma tulosti “Hello World!” kuten pitikin. Näin ollen Python-tulkki toimii samoin HelloWorld-ohjelmani.
23:40
C++
C-kieli lähentelee jo puhdasta konekieltä, josta C++ on kenties helpoin omaksua java- tai python-pohjatiedoilla. Tässäkin testissä kokeilin asentaa C-tulkin ja ajaa HelloWorld-ohjelman, joka tulostaa “Hello World” -tekstin.
19.9.2012
00:00 Tulkin asennus
asensin komentorivitulkilla C-tulkin version 4.5 seuraavalla komennolla
$ sudo apt-get install gcc-4.5
tämän jälkeen loin /home/krister/codes/ -kansioon tiedoston HelloWorld.cpp komennolla
$ nano HelloWorld.cpp
kirjoittamani koodi löytyy osoitteesta
seuraavaksi tallensin tiedoston ctrl + X painamalla
00:17 tiedoston muokkaus
annoin tulkin tehdä ajettavan version tiedostostani, joten kirjoitin komennon
$ g++ HelloWorld.cpp -o HelloWorld.
Nyt ohjelman pystyi ajamaan bashilla komennolla
$ ./HelloWorld.
Jolloin ohjelma tulosti tekstin “Hello, World!”. Näinollen C-tulkki asentui oikein ja pystyy kääntämään koodia ongelmitta sekä ohjelmani oli kelvollinen.
Lähde:
http://en.wikipedia.org/wiki/Hello_world_program_examples
GNU GENERAL PUBLIC LICENSE
Version 3, 29 June 2007
Copyright (C) 2007 Free Software Foundation, Inc. <http://fsf.org/>
Everyone is permitted to copy and distribute verbatim copies
of this license document, but changing it is not allowed.
OpenSSH-palvelimen asennus ja käyttö
Sain etätehtäväksi asentaa koneelleni linuxilla hyvin tärkeän ohjelman, eli openSSH-demonin.
Lyhyesti SSH:sta: kyseessä on suora yhteys eli protokolla kahden päätelaitteen (serveri, kännykkä, tietokone jne.) välillä ja mikä tärkeintä, yhteys on salattu suojausavaimella. Suojaus on nykyään erittäin tärkeää ettei avointa yhteyttä käytetä ulkopuolisen toimesta väärin, esimerkiksi murtautumalla avoimesta portista ja kaappaamalla serverin tai tietokoneen hallinta. SSH:ssa suojaus tapahtuu suojausavaimia käyttämällä, jotka lähetetään yhteydessä oleviin päätelaitteisiin. Ennen datan lähettämistä toiselle koneelle, se salataan käyttämällä salausavaimen määrittämää salausalgoritmia ja vastaavasti puretaan samalla avaimella vastaanottavassa päädyssä. Periaatteessa algoritmi voisi olla mikä tahansa tunnettu salausmenetelmä, mutta Internet Engineering Task Force, eli IETF on määrittänyt SSH-yhteyksille vakituisen standardisuojausalgoritmin, jotta vältyttäisiin salauksien yhteensopivuusongelmilta.
OpenSSH-server-ohjelman tarkoituksena on Apachen tavoin toimia isäntäpalvelimena, joka muodostaa SSH-yhteyden sitä pyytävän asiakasohjelman kanssa (esimerkiksi kännykkä). Tämä mahdollistaa oman tietokoneen etäkäytön internet-yhteyden välityksellä sekä kiinteiden, salattujen yhteyksien luomisen erilliselle palvelimelle.
Kokeilin OpenSSH:n toimivuutta omalla kannettavalla tietokoneellani, johon olen asentanut Xubuntu Linux 12.04 -käyttöjärjestelmän
Asentaminen
11.9.2012
23:41Asennus
asensin OpenSSH-demonin käynnistämällä Xubuntun, avaamalla komentokehotteen eli Terminaalin ja käyttämällä komentoa
$ sudo apt-get install openssh-server
Terminaali ilmoitti demonin vaativan 891 kb kiintolevytilaa ja kysyi, haluanko jatkaa asennusta, johon vastasin kirjoittamalla “Y” eli yes.
23:46 Salasana
Seuraavaksi määritin käyttäjälle salasanan, jotta kuka tahansa ei pääsisi käsiksi yhteyteen koneeseeni. Tämän vaiheen voi ohittaa, jos ei käytä linuxin Live-CD:tä ja linux-käyttäjälle on asetettu kirjautumiseen salasana. Kirjoitin terminaaliin komennon
$ passwd
jolloin käyttäjältä kysytään nykyistä salasanaa, uutta salasanaa ja uusi salasana uudestaan
23:50 Testaus localhostina
Nyt openSSH-server asentui kannettavalle tietokoneelleni ja seuraavaksi kokeilin sen toimivuutta yhdistämällä demonille localhostina, eli verkkokortti toimii sekä asiakkaana, että palvelinhostina.
Kirjoitan komennon
$ ssh krister@localhost
jossa krister on linuxini käyttäjätilin nimi
seuraavaksi Terminaali kysyi, haluanko yhdistää palvelimelle vaikka palvelimen varmennetta ei tunnistettu. Kirjoitan “yes” eli kyllä, sillä tunnen ja luotan kyseiseen palvelimeen (kyseessähän on oma tietokoneeni, johon yhdistän).
Tämän jälkeen palvelin pyytää salasanaa, johon tietysti kirjoitan käyttäjätilini salasanan.
Nyt olen onnistuneesti kirjautunut omalta koneeltani omalle koneelleni käyttäen SSH-yhteyttä. Asian voi vielä todentaa tapahtumalokista, joka on /var/log/Auth.log
Avasin 10 viimeisintä merkintää komennolla
$ tail /var/log/Auth.log
joka tulosti seuraavaa:

neljänneksi viimeisellä rivillä on merkintä salasanan hyväksymisestä ja kolmanneksi viimeinen rivi ilmoittaa istunnon avautuneen krister-nimiselle asiakkaalle, eli yhteys avattiin onnistuneesti ja pystyin etäkäyttämään konettani.
00:17 Testi ulkoiselta palvelimelta
Tein vielä yhden yhdistämistestin yhdistämällä omalta koneeltani kouluni myy-palvelimelle ja sieltä edelleen takaisin omalle koneelleni (openSSH-demoniin)
Lyhyesti vielä kaaviona yhteysreitti:
Oma kone (asiakas) —-SSH—-> koulun myy-palvelin —-SSH—-> Oma kone (OpenSSH)
Lopputuloksena pystyn ohjaamaan omaa konettani samalla tavalla kuin edellisessä testissä, tässä tapauksessa komentodata vain kulki koulun myy-palvelimen välityksellä.
Suljin ensin aiemman localhost-yhteyteni komennolla
$ exit
00:22 Testaus
Aluksi tarkistin IP-osoitteeni omalle koneelleni komennolla
$ ip addr
IP-osoite löytyi koneeni tapauksessa kohdasta “3: wlan0:”, koska minulla on langaton wlan-yhteys. Kiinteällä ethernet-kaapelilla IP-osoitteeni lukisi kohdassa “2: eth0”
seuraavaksi yhdistin koulun palvelimelle komennolla
$ ssh [opiskelijanumero]@myy.haaga-helia.fi
palvelin kysyi jälleen salasanaa, jonka jälkeen yhteys koulun palvelimelle muodostui.
Seuraavaksi yhdistin takaisin omalle koneelleni komennolla
$ ssh krister@[IP-osoitteeni]
Tästä tuli kuitenkin virheilmoitus: ssh: connect to host XXX.XXX.X.XX port 22: No route to host.
Luultavasti kyseinen virhe johtuu modeemini palomuurista, jolla on oma IP-osoitteensa.
Lähde:
http://fi.wikipedia.org/wiki/SSH
GNU Free Documentation License
Version 1.3, 3 November 2008
Copyright © 2000, 2001, 2002, 2007, 2008 Free Software Foundation, Inc. <http://fsf.org/>
Everyone is permitted to copy and distribute verbatim copies of this license document, but changing it is not allowed.
